
# Getting Started ## Docker [Youtube Tutorial](https://www.youtube.com/playlist?list=PL2aZOA2wNP8tn-Py-XTF-B6nfx8l-4SwA) The Docker Container Repository is the most reliable and up-to-date distribution channel for LubeLogger. You need to have Docker installed and Virtualization enabled(typically a BIOS setting). You will then clone [docker-compose.yml](https://github.com/hargata/lubelog/blob/main/docker-compose.yml) onto your computer from the repository. Run the following commands to pull down the image and run container. ``` docker pull ghcr.io/hargata/lubelogger:latest docker compose up -d ``` By default the app will start listening at localhost:8080, this port can be configured in the docker-compose file. [Docker Image Mirror](https://hub.docker.com/r/hargata/lubelogger) on Docker Hub ### Kubernetes Deployment [Helm Chart](https://artifacthub.io/packages/helm/anza-labs/lubelogger) provided by [Anza-Labs](https://github.com/anza-labs) ### Edge-tagged Image The `:edge` tagged Docker image may contain features that are considered experimental/not fully tested but have been merged into the main branch, use at your own risk. If you're building the Docker image manually and are cloning directly from the main branch of the repository, your local copy of the repository will contain those experimental features. ## Windows Standalone Executable Windows Standalone Executables(EXE) are provided, and can be found under assets for the [latest release](https://github.com/hargata/lubelog/releases/latest)  To run the server, you just have to download the zip archive attached to the release, usually named LubeLogger_vNNN_win_x64.zip, extract the archive and double click on CarCareTracker.exe When using this approach, the default port the app will be listening on is 5000, so you will navigate to localhost:5000 ### Run Executable in Background The following steps describes how to run LubeLogger as a pseudo-service that is started whenever Windows is booted up. Note that LubeLogger cannot run as a true Windows Service as that will break cross-platform compatibility; however, it can run in the background with similar behaviors to a Windows Service. 1. Launch `Task Scheduler` - should come with every copy of Windows 2. Create a Task, note `Hidden` and `Run whether user is logged on or not` in `General` tab 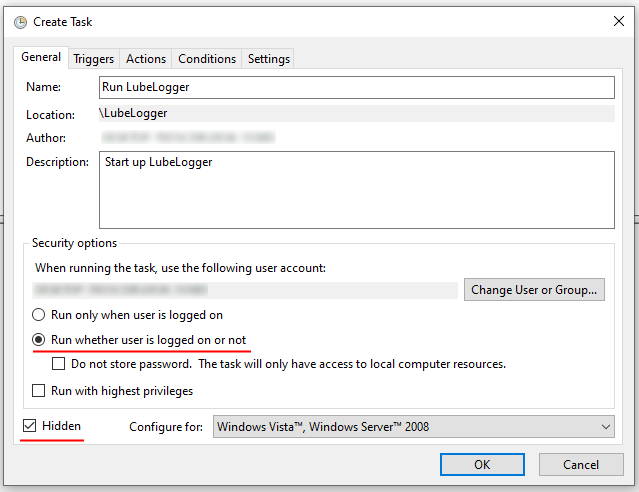 3. In `Triggers` tab, create a new trigger for `At startup`  4. In `Actions` tab, create an action to launch `path\to\lubelogger\CarCareTracker.exe` and set the `Start in` to the folder the executable is in i.e.: `path\to\lubelogger`  5. Click `Ok` to create the task, then right click on the task and click `Run` 6. LubeLogger should now run in the background   7. To stop LubeLogger, right click on the Task and select `End` ## Linux Baremetal Linux executables are provided and can be found under assets for the [latest release](https://github.com/hargata/lubelog/releases/latest) [Youtube Tutorial](https://www.youtube.com/playlist?list=PL2aZOA2wNP8tR21myT_s0T0tneoRi0vdT) To run the Linux executable, download the zip file named LubeLogger_vNNN_linux_x64.zip, extract it and run the following commands: ``` chmod 777 ./CarCareTracker ./CarCareTracker ``` **Note:** `chmod 777` above is only used to rule out permission quirks/issues, please restrict the permissions to the lowest acceptable level once you have verified that LubeLogger can be executed on your machine. ## Test that It Works Whichever path you choose, once you get the app up and running, just navigate to the IP address and port the server is listening to and you should be able to see the app Next steps: [[Configuring Server Settings|Installation/Server Settings]]