
Commit 2b40a9
2024-09-20 15:19:12 DESKTOP-T0O5CDB\DESK-555BD: set docs to mirror docs repo| /dev/null .. LICENSE | |
| @@ 0,0 1,21 @@ | |
| + | MIT License |
| + | |
| + | Copyright (c) 2024 Hargata Softworks |
| + | |
| + | Permission is hereby granted, free of charge, to any person obtaining a copy |
| + | of this software and associated documentation files (the "Software"), to deal |
| + | in the Software without restriction, including without limitation the rights |
| + | to use, copy, modify, merge, publish, distribute, sublicense, and/or sell |
| + | copies of the Software, and to permit persons to whom the Software is |
| + | furnished to do so, subject to the following conditions: |
| + | |
| + | The above copyright notice and this permission notice shall be included in all |
| + | copies or substantial portions of the Software. |
| + | |
| + | THE SOFTWARE IS PROVIDED "AS IS", WITHOUT WARRANTY OF ANY KIND, EXPRESS OR |
| + | IMPLIED, INCLUDING BUT NOT LIMITED TO THE WARRANTIES OF MERCHANTABILITY, |
| + | FITNESS FOR A PARTICULAR PURPOSE AND NONINFRINGEMENT. IN NO EVENT SHALL THE |
| + | AUTHORS OR COPYRIGHT HOLDERS BE LIABLE FOR ANY CLAIM, DAMAGES OR OTHER |
| + | LIABILITY, WHETHER IN AN ACTION OF CONTRACT, TORT OR OTHERWISE, ARISING FROM, |
| + | OUT OF OR IN CONNECTION WITH THE SOFTWARE OR THE USE OR OTHER DEALINGS IN THE |
| + | SOFTWARE. |
| /dev/null .. README.md | |
| @@ 0,0 1,2 @@ | |
| + | # lubelog_docs |
| + | Documentation for LubeLogger |
| additional fields/image-1707880663277.png .. /dev/null | |
| additional fields/image-1707880740902.png .. /dev/null | |
| additional fields/image-1707880988975.png .. /dev/null | |
| additional fields/image-1709320050928.png .. /dev/null | |
| additional fields/image-1709320244964.png .. /dev/null | |
| additional fields.md .. advanced/additional fields.md | |
| @@ 2,15 2,15 @@ | |
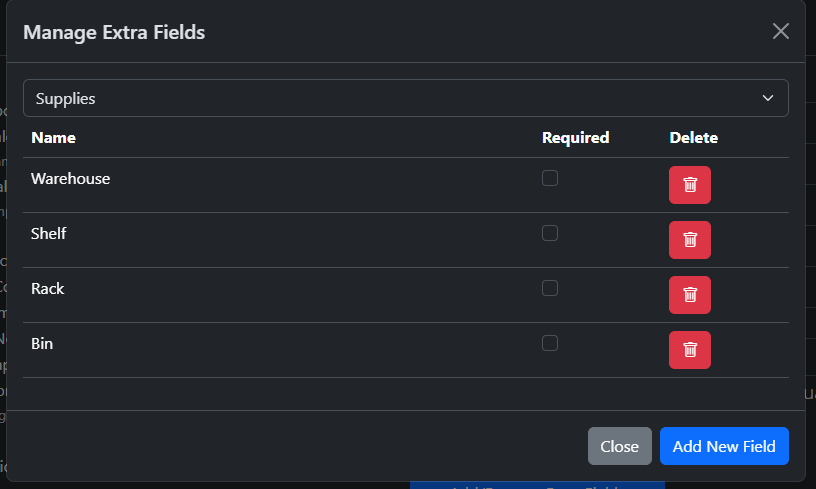
| If you require more fields than what is provided in LubeLogger, you can easily add more fields via the Additional Fields Manager located in the Settings tab. You have to be logged in as the root user in order to access this feature. | |
| - |  |
| + |  |
| The Additional Fields Manager contains a dropdown that contains the records you can append additional tabs to along with a list of additional fields for that record. | |
| - |  |
| + |  |
| You can also mark additional fields as required, which means that they have to be filled out when adding / editing records or the system will throw an error. | |
| - |  |
| + |  |
| ## Displaying Additional Fields | |
| @@ 18,10 18,10 @@ | |
| To make the additional field columns visible, simply check the column name in the dropdown right next to the Add Record button | |
| - |  |
| + |  |
| ## Vehicle Level Additional Fields | |
| As of 1.2.4, users can now add additional fields at the vehicle level. Extra fields will now replace pinned notes in the tooltip that shows up when you hover over a vehicle tile. | |
| - |  |
| + |  |
| /dev/null .. advanced/additional fields/image-1726781485741.png | |
| /dev/null .. advanced/additional fields/image-1726781489888.png | |
| /dev/null .. advanced/additional fields/image-1726781493285.png | |
| /dev/null .. advanced/additional fields/image-1726781497296.png | |
| /dev/null .. advanced/additional fields/image-1726781501904.png | |
| api.md .. advanced/api.md | |
| environment variables.md .. advanced/environment variables.md | |
| https.md .. advanced/https.md | |
| openid.md .. advanced/openid.md | |
| @@ 58,9 58,9 @@ | |
| ## Testing | |
| Once you have all these environment variables injected correctly, you should see the ability to login via your OIDC provider. Note: Currently LubeLogger only supports one OIDC provider. | |
| - |  |
| + |  |
| - |  |
| + |  |
| LubeLogger uses the user's email address to authenticate against a registered user, the email address provided by the OIDC provider must match the email address of the user in the system. | |
| /dev/null .. advanced/openid/image-1726781322923.png | |
| /dev/null .. advanced/openid/image-1726781326911.png | |
| postgres.md .. advanced/postgres.md | |
| @@ 6,7 6,7 @@ | |
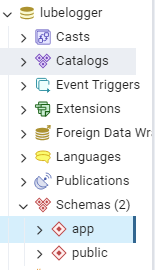
| To configure LubeLogger to use PostgreSQL, you must first create a database with a schema named "app" in it, in the screenshot below we created a DB named "lubelogger" and then a schema named "app". | |
| - |  |
| + |  |
| Once that is done, simply inject the environment variable `POSTGRES_CONNECTION` with your connection string, example: | |
| @@ 24,7 24,7 @@ | |
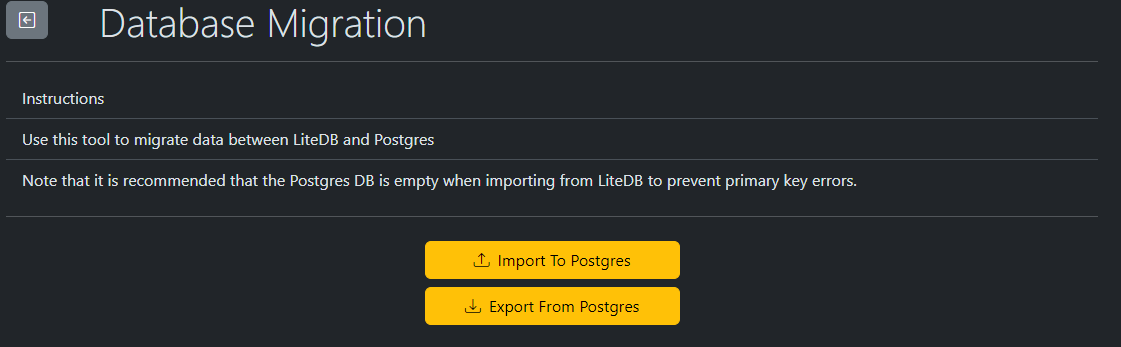
| A tool is provided to ease the migration process between LiteDB and Postgres. This tool can be found at the `/migration` endpoint and is only accessible when a Postgres connection is provided. | |
| - |  |
| + |  |
| ### Importing to Postgres | |
| /dev/null .. advanced/postgres/image-1726781278694.png | |
| /dev/null .. advanced/postgres/image-1726781283739.png | |
| technical docs.md .. advanced/technical docs.md | |
| @@ 43,7 43,7 @@ | |
| Root user credentials are hashed using SHA256 for both username and password. These credentials are not stored in the database and instead are stored in a separate config json file. What this means is that in the event of a data breach, the root user credentials are still going to be very secure. | |
| ## OpenID Connect(OIDC) User Credentials | |
| - | If a user registered via OIDC by logging in via the OIDC Provider and then providing a registration token, a randomized hashed password is generated on their behalf. See [[OpenID]] |
| + | If a user registered via OIDC by logging in via the OIDC Provider and then providing a registration token, a randomized hashed password is generated on their behalf. See [[OpenID|Advanced/OpenID]] |
| ## Email/SMTP Credentials | |
| LubeLogger does not store SMTP credentials and in fact should NOT be responsible for storing SMTP credentials. SMTP credentials can only be injected via environment variables or appsettings. | |
| @@ 62,7 62,7 @@ | |
| LubeLogger utilizes LiteDB, a sqlite-like noSQL file-based database. Generally this is a non-issue due to how efficient the DB is at indexing, but relying on a file database means that LubeLogger can potentially be subjected to file locks and access issues if there are enough concurrent requests made to the database. | |
| - | If you find yourself needing more scalability for the database backend, consider configuring LubeLogger to utilize a [[PostgreSQL backend|Postgres]]. |
| + | If you find yourself needing more scalability for the database backend, consider configuring LubeLogger to utilize a [[PostgreSQL backend|Advanced/Postgres]]. |
| ## Reminder Urgencies | |
| Reminder urgencies are calculated at every tab load. i.e.: whenever a tab is loaded in the vehicle details page, an async method retrieves the reminders, calculates their urgencies and automatically refresh past due reminders(if enabled). This can potentially present scalability issues if a vehicle has a large amount of recurring reminders. | |
| webhook.md .. advanced/webhook.md | |
| @@ 4,7 4,7 @@ | |
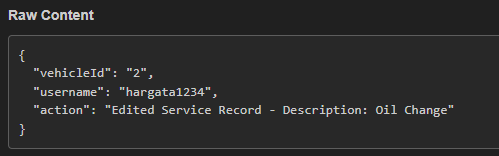
| Example payload: | |
| - |  |
| + |  |
| Triggers: | |
| /dev/null .. advanced/webhook/image-1726781444936.png | |
| dashboard/image-1706477226029.png .. /dev/null | |
| dashboard/image-1706477893556.png .. /dev/null | |
| dashboard/image-1706478028103.png .. /dev/null | |
| dashboard/image-1706574709106.png .. /dev/null | |
| dashboard/image-1706574853389.png .. /dev/null | |
| dashboard/image-1706633228249.png .. /dev/null | |
| dashboard/image-1708124262715.png .. /dev/null | |
| dashboard/image-1713319167151.png .. /dev/null | |
| dashboard/image-1713319274861.png .. /dev/null | |
| dashboard/image-1713319776561.png .. /dev/null | |
| funding/image-1716312692019.29.52_AM.png .. /dev/null | |
| funding/image-1716313449179.42.40_AM.png .. /dev/null | |
| getting started/image-1708657703682.png .. /dev/null | |
| home.md .. | |
| @@ 3,13 3,13 @@ | |
| This is the documentation for LubeLogger, a self-hosted, open-source, collaborative Vehicle Maintenance and Fuel Mileage Tracker. | |
| ### Installation Instructions: | |
| - | - [[Getting Started]] |
| - | - [[Authentication]] |
| - | - [[Troubleshooting]] |
| + | - [[Getting Started|Installation/Getting Started]] |
| + | - [[Authentication|Installation/Authentication]] |
| + | - [[Troubleshooting|Installation/Troubleshooting]] |
| ### Vehicle Management: | |
| - | - [[Adding/Editing/Deleting Vehicles|Vehicle Management]] |
| - | - [[Dashboard]] |
| + | - [[Adding/Editing/Deleting Vehicles|Vehicles/Vehicle Management]] |
| + | - [[Dashboard|Vehicles/Dashboard]] |
| ### Tabs: | |
| - [[Service/Repair/Upgrade Records|Records/Service Records]] | |
| @@ 20,23 20,23 @@ | |
| - [[Supplies|Records/Supplies]] | |
| - [[Reminders|Records/Reminders]] | |
| - [[Notes|Records/Notes]] | |
| - | - [[Bulk Operations]] |
| + | - [[Bulk Operations|Records/Bulk Operations]] |
| ### Advanced: | |
| - | - [[API]] |
| - | - [[Webhook]] |
| - | - [[Authentication via OIDC|OpenID]] |
| - | - [[Manage Additional Fields|Additional Fields]] |
| - | - [[Setting up HTTPS|HTTPS]] |
| - | - [[Postgres]] |
| - | - [[Environment Variables]] |
| - | - [[Technical Docs]] |
| + | - [[API|Advanced/API]] |
| + | - [[Webhook|Advanced/Webhook]] |
| + | - [[Authentication via OIDC|Advanced/OpenID]] |
| + | - [[Manage Additional Fields|Advanced/Additional Fields]] |
| + | - [[Setting up HTTPS|Advanced/HTTPS]] |
| + | - [[Postgres|Advanced/Postgres]] |
| + | - [[Environment Variables|Advanced/Environment Variables]] |
| + | - [[Technical Docs|Advanced/Technical Docs]] |
| ### Misc: | |
| - | - [[Replacing The Logo]] |
| - | - [[Translations]] |
| - | - [[Project Roadmap|Roadmap]] |
| - | - [[Funding]] |
| - | - [[LubeLogger Builder]] |
| - | - [[Manifesto/Developer's Motivation|Motivation]] |
| - | - [[Annual Hiatus]] |
| + | - [[Replacing The Logo|Misc/Replacing The Logo]] |
| + | - [[Translations|Misc/Translations]] |
| + | - [[Project Roadmap|Misc/Roadmap]] |
| + | - [[Funding|Misc/Funding]] |
| + | - [[LubeLogger Builder|Misc/LubeLogger Builder]] |
| + | - [[Manifesto/Developer's Motivation|Misc/Motivation]] |
| + | - [[Annual Hiatus|Misc/Annual Hiatus]] |
| authentication.md .. installation/authentication.md | |
| @@ 10,23 10,23 @@ | |
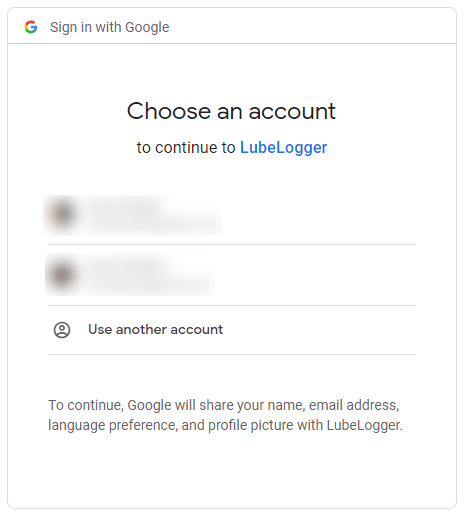
| Once you have entered the credentials, click the "Setup" button and you will be redirected to a login screen, enter the credentials of the Root/Super User here to login. | |
| ## Creating / Inviting New Users | |
| - | LubeLogger relies on an invitation-only model for creating/registering new users. It is highly recommended that LubeLogger is configured with SMTP in order to make the user registration process as smooth as possible, see [[Getting Started]] for more information regarding SMTP configuration. |
| + | LubeLogger relies on an invitation-only model for creating/registering new users. It is highly recommended that LubeLogger is configured with SMTP in order to make the user registration process as smooth as possible, see [[Getting Started|Installation/Getting Started]] for more information regarding SMTP configuration. |
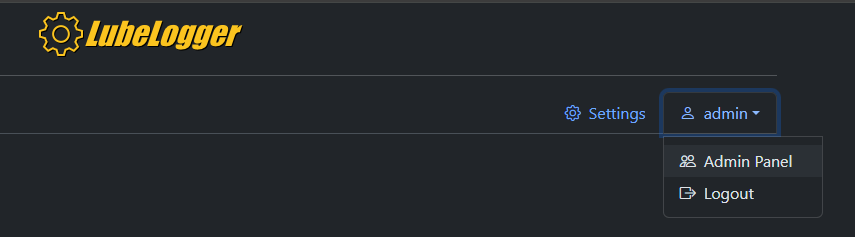
| To Create/Invite New Users, you first need to enable authentication and set up the Root User credentials. Once that is done, upon login, you will see that there is now a dropdown to the right of the "Settings" tab that has your root username on it. Click on that dropdown and select "Admin Panel" | |
| - |  |
| + |  |
| You will now be taken to a new page. There are two sections in this page, Tokens and Users. | |
| - |  |
| + |  |
| Tokens are used for invitees to register their user account or existing users to reset their password. These tokens are single use and are validated against the email address they are issued for. | |
| Users, as the name suggests, is a list of users in the system. You can also mark or unmark existing users as Admins here, see below to understand what permissions Admin users have. | |
| To invite a user, simply click on the "Generate User Token" button and type in their email address, note that this is case-sensitive. | |
| - |  |
| + |  |
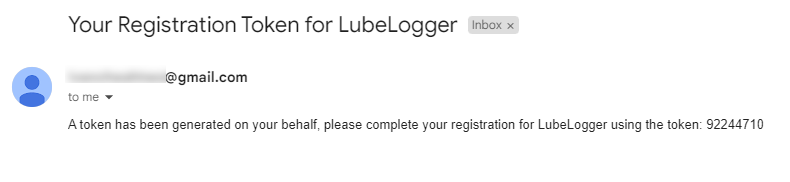
| If SMTP is configured and the Auto Notify(via Email) switch is checked, the user will receive an email that looks like this: | |
| - |  |
| + |  |
| ## Root/Super User | |
| You might be tempted to use your root credentials as your main credentials, and there is nothing wrong that, but you should know that there are a few caveats associated with the root user. | |
| authentication/image-1706398957700.png .. installation/authentication/image-1726779846750.png | |
| authentication/image-1706398972637.png .. installation/authentication/image-1726779853802.png | |
| authentication/image-1706398926360.png .. installation/authentication/image-1726779859968.png | |
| authentication/image-1706398865186.png .. installation/authentication/image-1726779865910.png | |
| getting started.md .. installation/getting started.md | |
| @@ 46,7 46,7 @@ | |
| ## Windows Standalone Executable | |
| Windows Standalone Executables(EXE) are provided, and can be found under assets for the [latest release](https://github.com/hargata/lubelog/releases/latest) | |
| - |  |
| + |  |
| To run the server, you just have to download the zip archive attached to the release, usually named LubeLogger_vNNN_win_x64.zip, extract the archive and double click on CarCareTracker.exe | |
| /dev/null .. installation/getting started/image-1726779812322.png | |
| troubleshooting.md .. installation/troubleshooting.md | |
| @@ 45,7 45,7 @@ | |
| >| ### Schema Does Not Exist | |
| >| | |
| - | >| Make sure that there is a schema named "app" in the database as specified in the Postgres connection string. For more information, see [[Postgres]] |
| + | >| Make sure that there is a schema named "app" in the database as specified in the Postgres connection string. For more information, see [[Postgres|Advanced/Postgres]] |
| ## OpenID Connect(OIDC) Issues | |
| @@ 99,7 99,7 @@ | |
| } | |
| ``` | |
| - | Additionally, see [[Setting up HTTPS|HTTPS]] for HTTPS/SSL Cert Configuration |
| + | Additionally, see [[Setting up HTTPS|Advanced/HTTPS]] for HTTPS/SSL Cert Configuration |
| ### NGINX / Cloudflare | |
| LubeLogger is a web app that runs on Kestrel, it literally doesn't matter if it's deployed behind a reverse proxy or Cloudflare tunnel. As long as the app can receive traffic on the port it's configured on, it will run. | |
| international locale.md .. /dev/null | |
| @@ 1,30 0,0 @@ | |
| - | # International Locale |
| - | |
| - | LubeLogger supports international locale i.e.: localized date formats, currencies, numerical formats, month names, etc. |
| - | |
| - | To configure LubeLogger in your region's locale: |
| - | |
| - | ## Docker |
| - | Make sure that LC_ALL and LANG environment variables are set up and injected correctly. |
| - | |
| - | Example(Running LubeLogger in English(Germany) locale: |
| - | |
| - | ``` |
| - | LC_ALL=en_DE |
| - | LANG=en_DE |
| - | ``` |
| - | |
| - | ## Windows Standalone |
| - | Make sure that your computer is set up in the correct region and locale. |
| - | |
| - | Example(Running LubeLogger in English(Germany) locale: |
| - | |
| - |  |
| - | |
| - | Note that dates are displayed in dd/MM/yyyy format and that the currency symbol is set to Euros as well as the "," decimal separator: |
| - | |
| - |  |
| - | |
| - | Inputs such as the Date Picker will also adapt to the user's locale: |
| - | |
| - |  |
| international locale/image-1708054817813.png .. /dev/null | |
| international locale/image-1708054890818.png .. /dev/null | |
| international locale/image-1708054952574.png .. /dev/null | |
| annual hiatus.md .. misc/annual hiatus.md | |
| funding.md .. misc/funding.md | |
| lubelogger builder.md .. misc/lubelogger builder.md | |
| motivation.md .. misc/motivation.md | |
| @@ 29,11 29,11 @@ | |
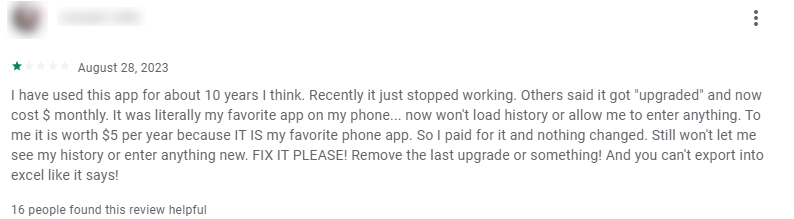
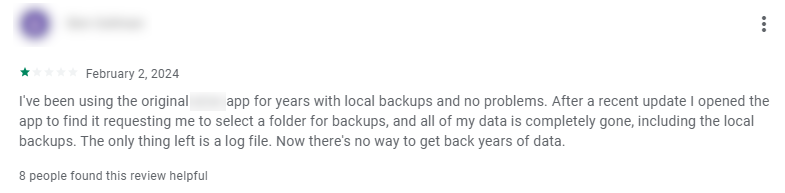
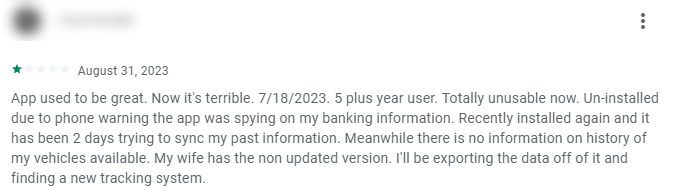
| The following reviews are of a competing app that have recently went through what we in the tech industry termed "Enshittification" that examplifies everything that can go wrong with being heavily reliant on "the cloud" | |
| - |  |
| + |  |
| - |  |
| + |  |
| - |  |
| + |  |
| While it may appear that there are numerous competent alternatives to this specific app in the market, there are absolutely no guarantees that those apps will be able to maintain their scalability in the future especially when their user count grows exponentially. | |
| @@ 49,4 49,4 @@ | |
| ### Revenue Generation | |
| - | LubeLogger does not yet pay the bills, we are entirely dependent on donations to fund our development effort. Please see [[Funding]] on how to contribute. |
| + | LubeLogger does not yet pay the bills, we are entirely dependent on donations to fund our development effort. Please see [[Funding|Misc/Funding]] on how to contribute. |
| /dev/null .. misc/motivation/image-1726779500975.png | |
| /dev/null .. misc/motivation/image-1726779506523.png | |
| /dev/null .. misc/motivation/image-1726779517524.png | |
| replacing the logo.md .. misc/replacing the logo.md | |
| roadmap.md .. misc/roadmap.md | |
| translations.md .. misc/translations.md | |
| @@ 13,7 13,7 @@ | |
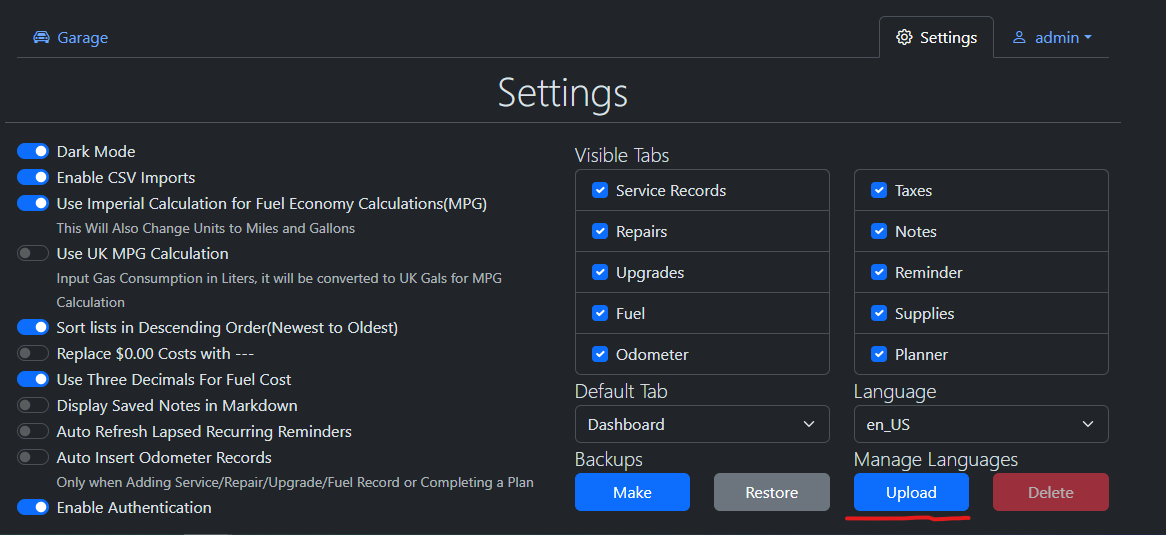
| 1. To upload a translation file, login as the root user. | |
| 2. Navigate to "Settings" | |
| 3. Click "Upload" under the "Manage Languages" section | |
| - |  |
| + |  |
| 4. Select the language file you wish to upload | |
| 5. The page should refresh | |
| @@ 23,7 23,7 @@ | |
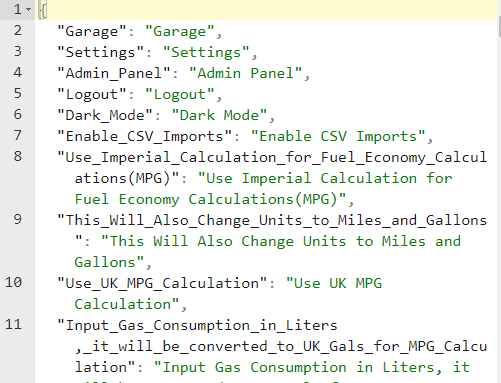
| 1. Download the [latest en_US.json](https://github.com/hargata/lubelog/blob/main/wwwroot/defaults/en_US.json) file from the GitHub Repository for LubeLogger. | |
| 2. Rename this file, en_US is a reserved name. | |
| 3. Use a JSON pretty-printer to make it human-readable | |
| - |  |
| + |  |
| 3. The objects to the left of the ":" are the translation keys, DO NOT modify these. | |
| 4. The objects to the right of the ":" are the translation values(shown in green), these are what you want to translate. | |
| /dev/null .. misc/translations/image-1726779630684.png | |
| /dev/null .. misc/translations/image-1726779638633.png | |
| motivation/image-1708323681256.png .. /dev/null | |
| motivation/image-1708323695601.png .. /dev/null | |
| motivation/image-1708323753699.png .. /dev/null | |
| motivation/image-1708323861989.png .. /dev/null | |
| motivation/image-1708324778418.png .. /dev/null | |
| openid/image-1708052127031.png .. /dev/null | |
| openid/image-1708052421948.png .. /dev/null | |
| openid/image-1708052614261.png .. /dev/null | |
| postgres/image-1707454502212.png .. /dev/null | |
| postgres/image-1707516092170.png .. /dev/null | |
| bulk operations.md .. records/bulk operations.md | |
| records/fuel records.md .. | |
| @@ 2,7 2,7 @@ | |
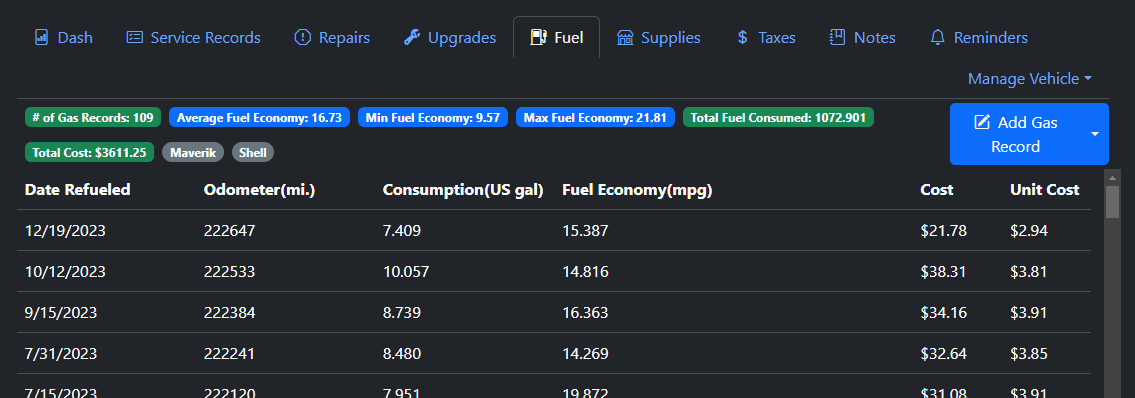
| The Fuel tab keeps track of the fuel mileage for your vehicle. | |
| - |  |
| + | 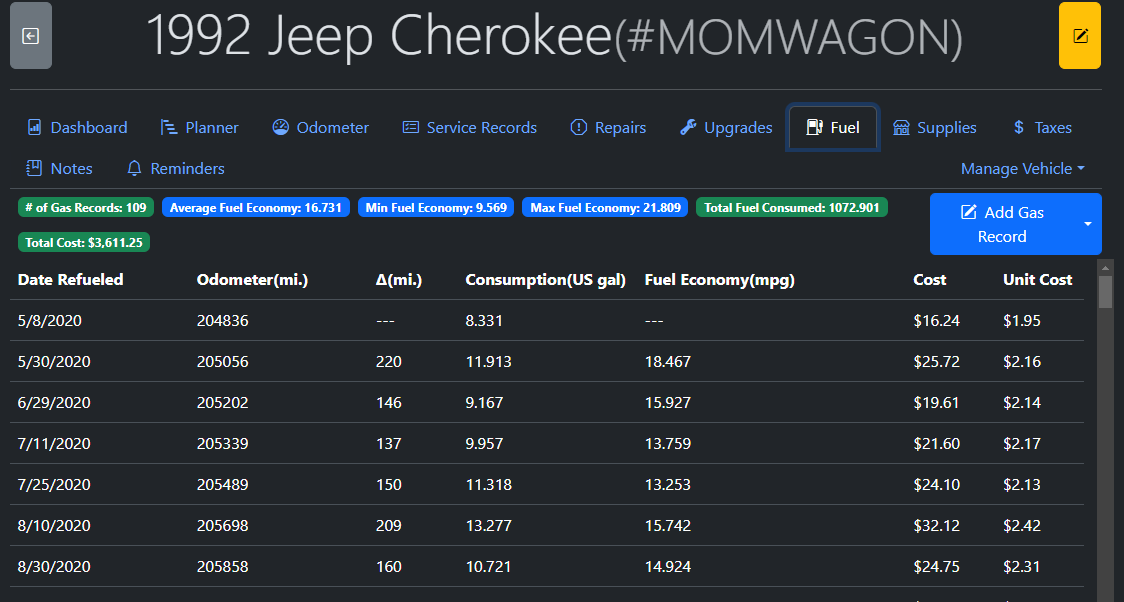 |
| LubeLogger supports fuel mileage calculation in the following formats: | |
| - American Imperial (MPG) | |
| @@ 19,7 19,7 @@ | |
| ### Partial Fuel Ups | |
| On the occassions that you cannot fill your vehicle up to full, you can defer the fuel mileage calculation by unchecking the "Is Filled To Full" switch. Doing this tells the app to defer fuel mileage calculation until the next Full Fill Up. | |
| - |  |
| + |  |
| ### Missed Fuel Ups | |
| Check this if you have missed a fuel up record prior to adding this fuel record. This effectively resets the fuel mileage calculation and will show up as $0 or "---" in the fuel records. Checking this ensures that the average fuel mileage calculation isn't skewed due to missed fuel ups. | |
| @@ 30,7 30,7 @@ | |
| ### Fuel Mileage by Tags | |
| To track fuel mileage across different fuel grades, gas stations, etc, you can either rely on the tagging functionality or add an extra field to the gas record. Filtering the records by tags or via searching the records will automatically update the average, min, and max fuel mileage labels. | |
| - |  |
| + |  |
| ## Fuel Units | |
| The consumption, fuel mileage, and odometer units are determined by two settings: "Use Imperial Calculation" and "Use UK MPG Calculation" | |
| @@ 43,7 43,7 @@ | |
| ### Alternate Fuel Units | |
| If you wish to see alternate units which converts the calculated units within the Gas Tab, you can right click on the table headers for Consumption and Fuel Economy. These settings persists for the user, so the next time you login to LubeLogger it will automatically perform the conversion for you. | |
| - |  |
| + |  |
| #### Consumption | |
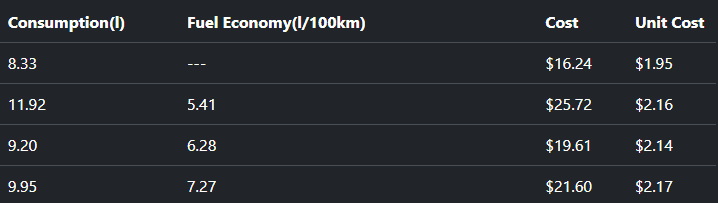
| For consumption, the units are cycled between US gal, Liters, and Imp Gal(UK). Changing the consumption unit will also change the unit cost. | |
| records/fuel records/image-1706405519426.png .. /dev/null | |
| records/fuel records/image-1706406318412.png .. /dev/null | |
| records/fuel records/image-1707455181666.png .. /dev/null | |
| records/fuel records/image-1711207761808.png .. /dev/null | |
| /dev/null .. records/fuel records/image-1726780458423.png | |
| /dev/null .. records/fuel records/image-1726780463015.png | |
| /dev/null .. records/fuel records/image-1726780470731.png | |
| /dev/null .. records/fuel records/image-1726780477610.png | |
| /dev/null .. records/fuel records/image-1726780486932.png | |
| records/fuel records/image-1706797201107.gif .. records/fuel records/image-1726780518163.gif | |
| records/fuel records/image-1711207860405.gif .. records/fuel records/image-1726780562015.gif | |
| records/notes.md .. | |
| @@ 5,25 5,25 @@ | |
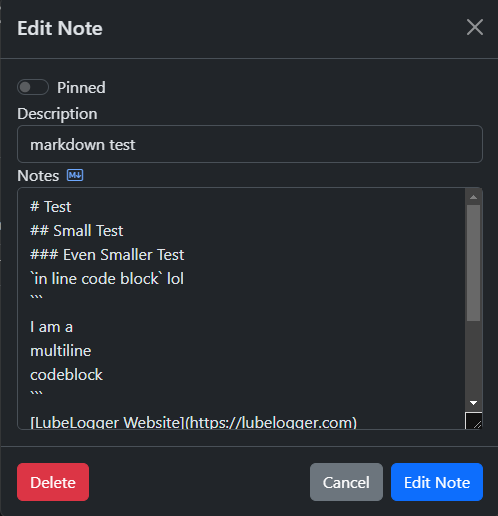
| ## Markdown Parsing | |
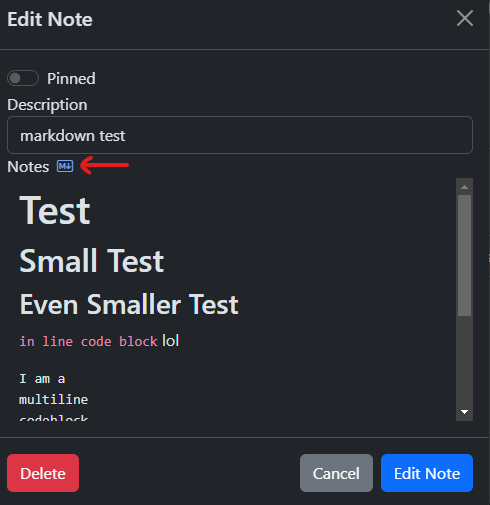
| Markdown formatting is supported across all Notes fields in the app. The underlying markdown parser is [Drawdown](https://github.com/adamvleggett/drawdown). To toggle between edit and preview mode, simply click on the markdown icon next to the "Notes" label. | |
| - |  |
| + |  |
| - |  |
| + |  |
| There is also a setting, that when enabled, will automatically load all notes in Markdown form when viewing existing records. The only exception is when an existing record has an empty notes field. | |
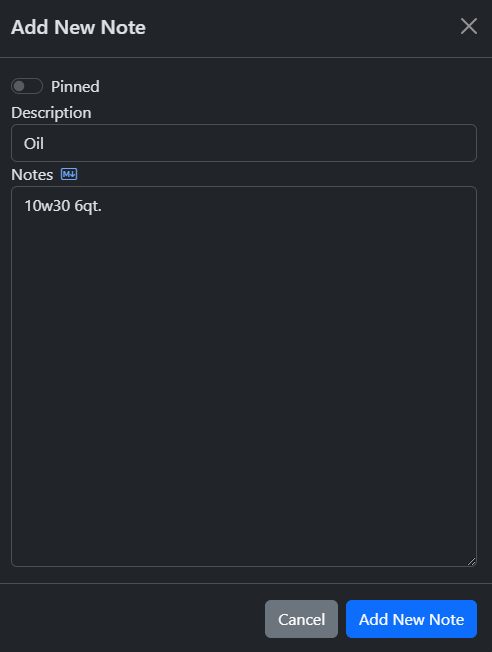
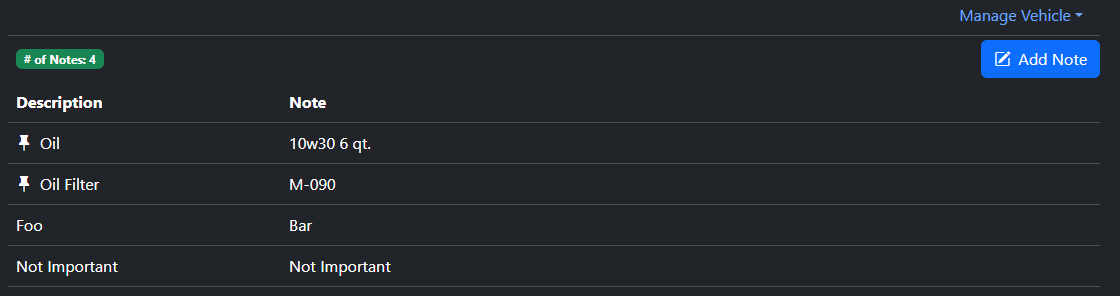
| ## Pinned Notes | |
| Notes can be pinned by checking the "Pinned" switch when creating or editing a note. | |
| - |  |
| + |  |
| Pinned Notes will always show up at the very top of the list. | |
| - |  |
| + |  |
| ## Bulk Operations | |
| On top of the standard Duplicate and Delete functions for records, you can also toggle, pin, or unpin notes in bulk. | |
| - |  |
| + | 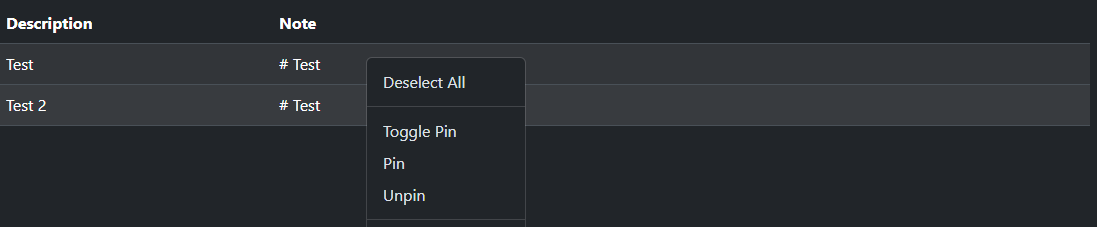 |
| - Toggle Pin - If the record is pinned it will be unpinned and vice versa. | |
| - Pin - Pin the selected records if they aren't pinned. | |
| records/notes/image-1706455388074.png .. /dev/null | |
| records/notes/image-1706455413890.png .. /dev/null | |
| records/notes/image-1706455460700.png .. /dev/null | |
| records/notes/image-1706633376978.png .. /dev/null | |
| records/notes/image-1708657076706.png .. /dev/null | |
| records/notes/image-1706634016273.png .. records/notes/image-1726779736880.png | |
| records/notes/image-1706634022811.png .. records/notes/image-1726779740992.png | |
| /dev/null .. records/notes/image-1726779745123.png | |
| /dev/null .. records/notes/image-1726779754183.png | |
| /dev/null .. records/notes/image-1726779758691.png | |
| records/planner.md .. | |
| @@ 2,7 2,7 @@ | |
| The Planner tab is where you can plan and track progress of future or current plans for your vehicle. The planner tab consists of 4 swimlanes(vertical panels) where plans can be moved to different stages via drag and drop. | |
| - |  |
| + | 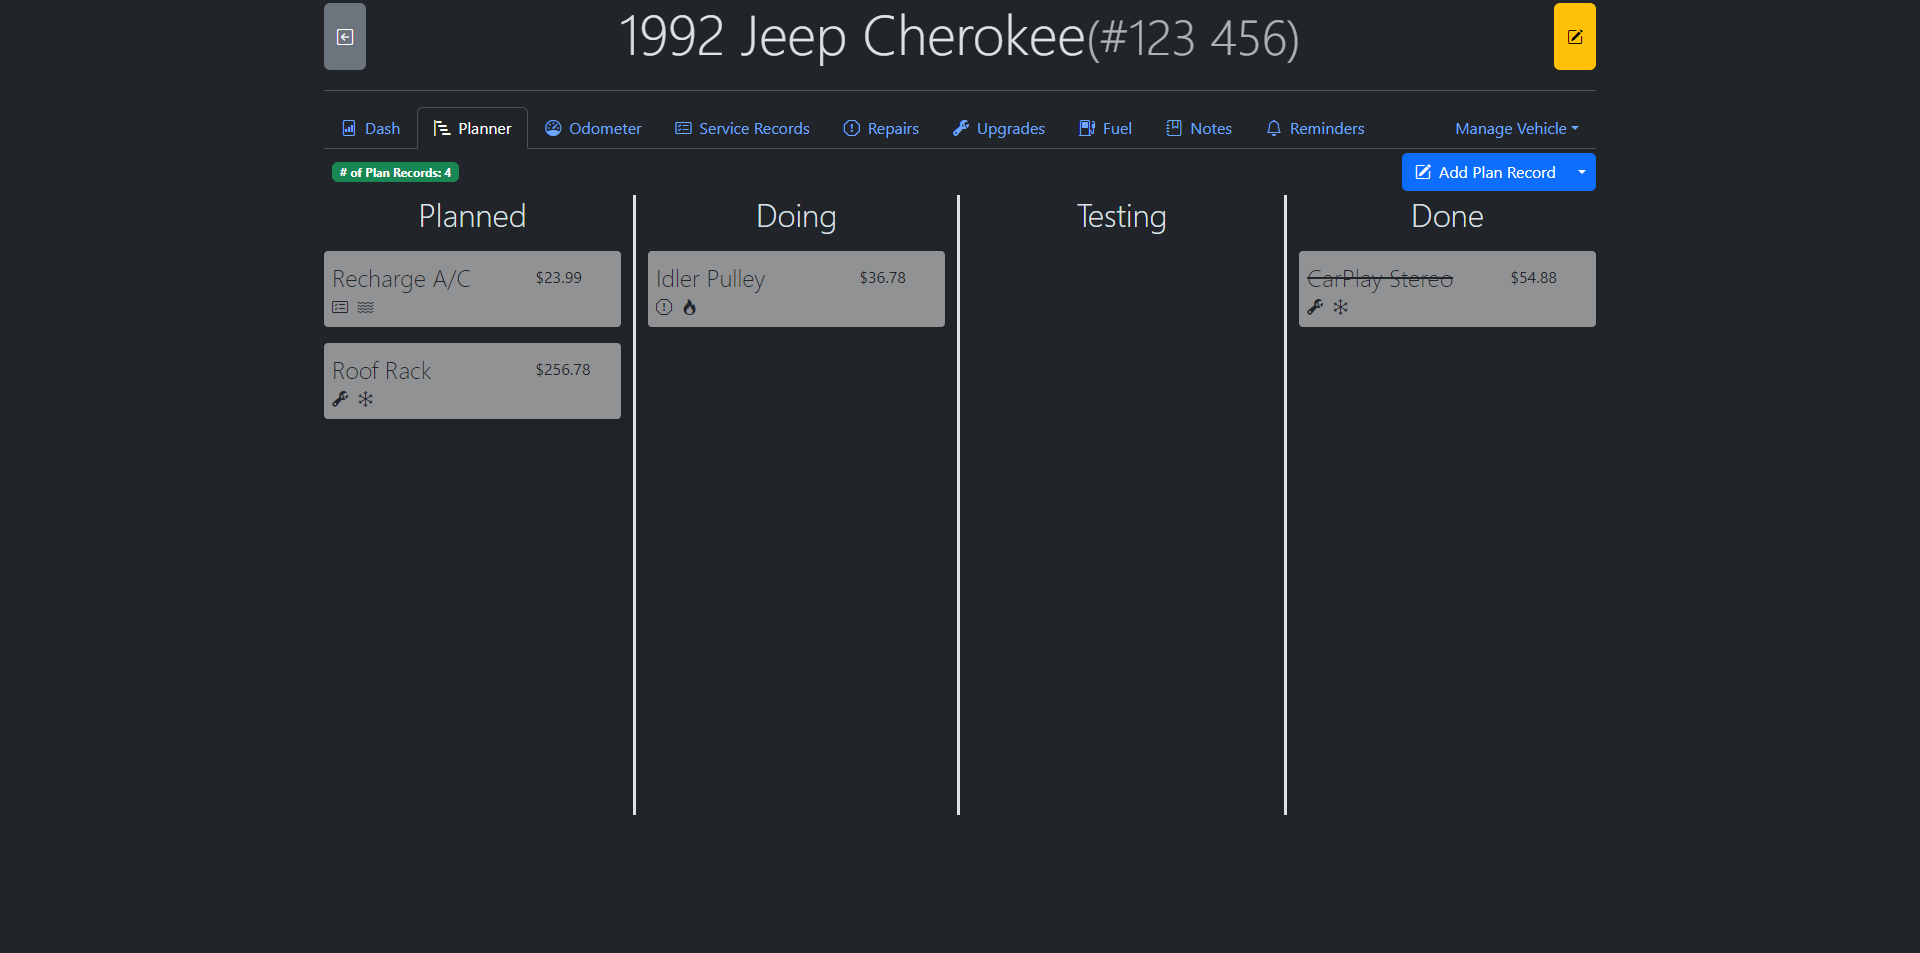 |
| The records stored in Service/Repair/Upgrade tabs tend to be inserted retroactively(after the work is done), hence the Planner tab was developed to keep track of To-Do's. | |
| @@ 11,7 11,7 @@ | |
| To add a new plan, simply click on the "Add Plan Record" button and fill in the details of the plan. | |
| - | 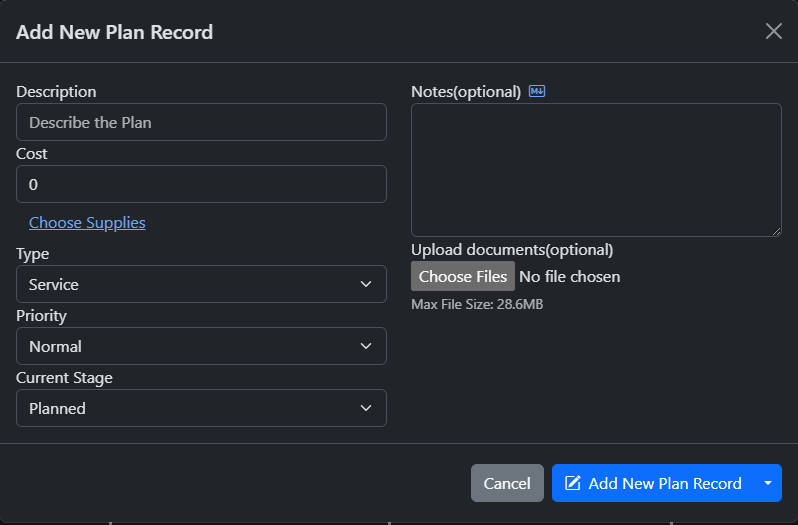 |
| + |  |
| ## Plan Type | |
| You are required to select at least one Plan Type - Service, Repair, or Upgrade. When the Plan Record is moved to Done, the Plan Record will be automatically converted into the selected type and it will then show up in its respective tab. The type is indicated by an icon corresponding to their respective tabs. | |
| @@ 19,7 19,7 @@ | |
| ## Plan Priority | |
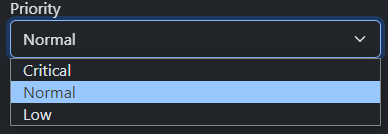
| Within the swimlanes, plans are sorted from Critical priority to Low priority. They are also indicated by an icon - Fire for Critical, Waves for Normal, and Snowflake for Low. | |
| - |  |
| + |  |
| ## Plan Stages | |
| **Planned** - This is considered the backlog, where no work has been performed yet. i.e.: Shopping for a lift kit. | |
| @@ 44,19 44,19 @@ | |
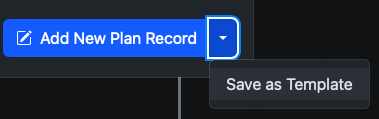
| ### Creating a Template | |
| To create a template, simply fill in the details / select the supplies to requisition for the plan, but instead of clicking the "Add New Plan Record" button, you will click on the dropdown next to it and select "Save As Template" | |
| - |  |
| + |  |
| The template will now be created and named after the description of the plan record. | |
| ### Using Templates | |
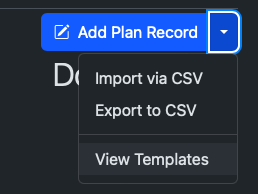
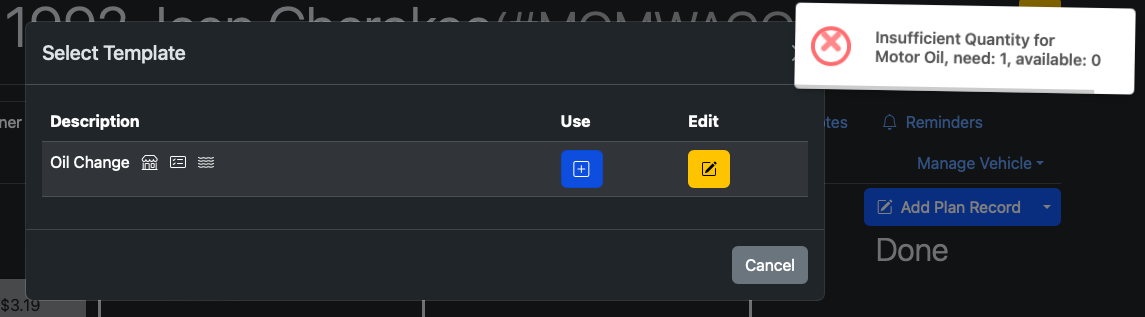
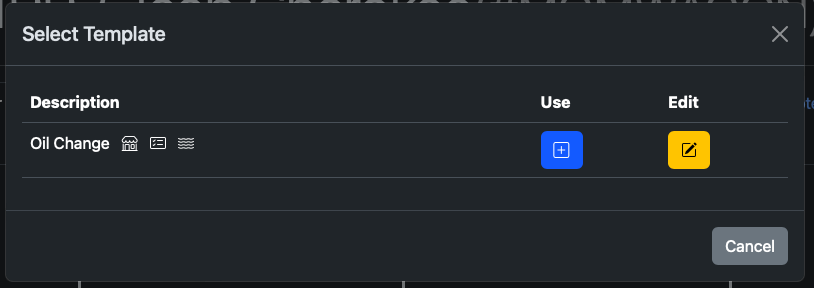
| To create a plan record from a template, click on the "View Templates button" and a dialog will show up with the saved templates for the vehicle | |
| - |  |
| + |  |
| - |  |
| + |  |
| The shop icon indicates if the template has supplies requisition and the paper clip icon(not shown) indicates if the template has file attachments. | |
| To use the template, simply click on the "+" button. The app will then perform a check to ensure that there are sufficient quantities of the supplies used by the template. If there are insufficient quantities, an error message will pop up telling you which supply is short. | |
| - |  |
| + |  |
| records/planner/image-1706459628783.png .. /dev/null | |
| records/planner/image-1706459640917.png .. /dev/null | |
| records/planner/image-1707453045755.png .. /dev/null | |
| records/planner/image-1707453250314.png .. /dev/null | |
| records/planner/image-1707453421824.png .. /dev/null | |
| records/planner/image-1707453431731.png .. /dev/null | |
| records/planner/image-1707453639902.png .. /dev/null | |
| records/planner/image-1713323956983.png .. /dev/null | |
| records/planner/image-1713323980659.png .. /dev/null | |
| records/planner/image-1713324052275.png .. /dev/null | |
| records/planner/image-1713324249206.png .. /dev/null | |
| records/planner/image-1706459391188.png .. records/planner/image-1726780281703.png | |
| /dev/null .. records/planner/image-1726780285003.png | |
| /dev/null .. records/planner/image-1726780289370.png | |
| /dev/null .. records/planner/image-1726780300201.png | |
| /dev/null .. records/planner/image-1726780304884.png | |
| /dev/null .. records/planner/image-1726780309471.png | |
| /dev/null .. records/planner/image-1726780313818.png | |
| records/reminders.md .. | |
| @@ 2,7 2,7 @@ | |
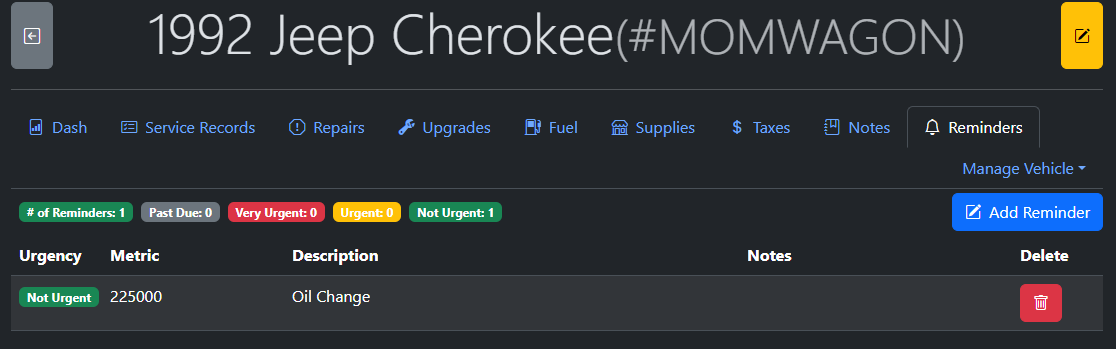
| Reminders are future tasks where the urgency are based on how close the user is to the due date or odometer reading. | |
| - |  |
| + |  |
| ## Adding Reminders | |
| Reminders can either be added directly on the Reminders tab by clicking the "Add Reminder" button or via adding a new [[Service/Repair/Upgrade Record|Records/Service Records#adding-reminders]]. | |
| @@ 10,7 10,7 @@ | |
| ## Reminder Metrics | |
| Similar to the maintenance schedule outlined in your vehicle's user manual, the urgency of a Reminder can be set either via a due date, a future odometer reading, or whichever comes first. | |
| - |  |
| + |  |
| ## Reminder Urgency | |
| Depending on the metric selected, reminder urgency is calculated either via the server's current date, the max odometer reading across the Odometer/Service/Repair/Upgrade/Fuel tabs, or whichever comes first. | |
| @@ 24,7 24,7 @@ | |
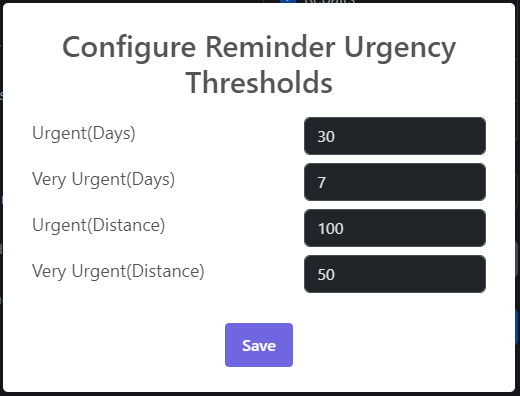
| The Root User can also set up custom reminder urgency thresholds in the Settings tab | |
| - |  |
| + |  |
| ## Recurring Reminders | |
| Reminders can be set to become recurring so that you don't have to create a new reminder for recurring maintenance such as oil changes. When you have completed the task set by the reminder, you can either have it automatically refresh when it lapses or by manually refreshing it. Refreshing a reminder effectively pushes out the due date or the odometer reading based on the recurring interval, i.e.: if a Reminder is due at 10000 miles and the interval is set at every 5000 miles, refreshing the Reminder will push the future odometer reading out to 15000 miles. | |
| @@ 32,18 32,16 @@ | |
| ### Automatically Refresh Past Due Reminders | |
| There is a setting within the Settings tab that allows users to automatically refresh past due reminders. Note that with this setting enabled, any reminder that becomes Past Due will be automatically refreshed, this requires a lot of diligence from the user to heed their reminders and stay on top of it. | |
| - |  |
| + |  |
| ### Manually Refresh Reminders | |
| When a recurring reminder falls into Very Urgent or Past Due status, there will be a button on the Reminders page that will allow the user to manually refresh the reminder. | |
| - |  |
| + | 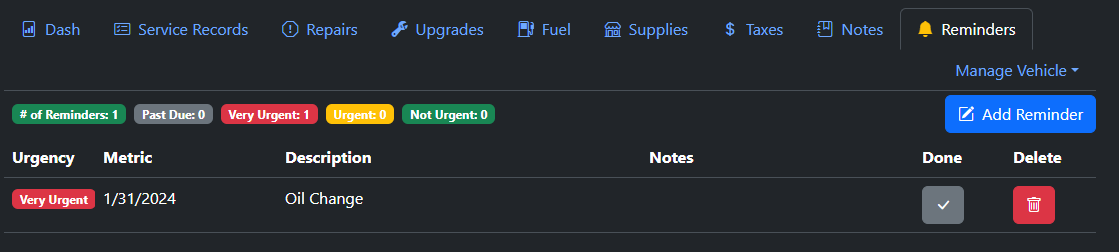 |
| This reminder is set to be recurring every 1 year, so when the "Done" button is clicked, it will push the due date of this reminder to 1/31/2025. | |
| - |  |
| - | |
| - |  |
| + |  |
| ## Reminder Emails | |
| If SMTP is configured within LubeLogger, the Root User can set up a cron / scheduled task that runs at an interval to send out emails to collaborators of vehicles with reminders. The API endpoint allows the user to specify what level of urgencies should the user be notified of. | |
| @@ 55,11 53,11 @@ | |
| ## Shop Calendar | |
| The shop calendar accessible on the homepage allows users to view all reminders with date metrics in a calendar view. | |
| - |  |
| + | 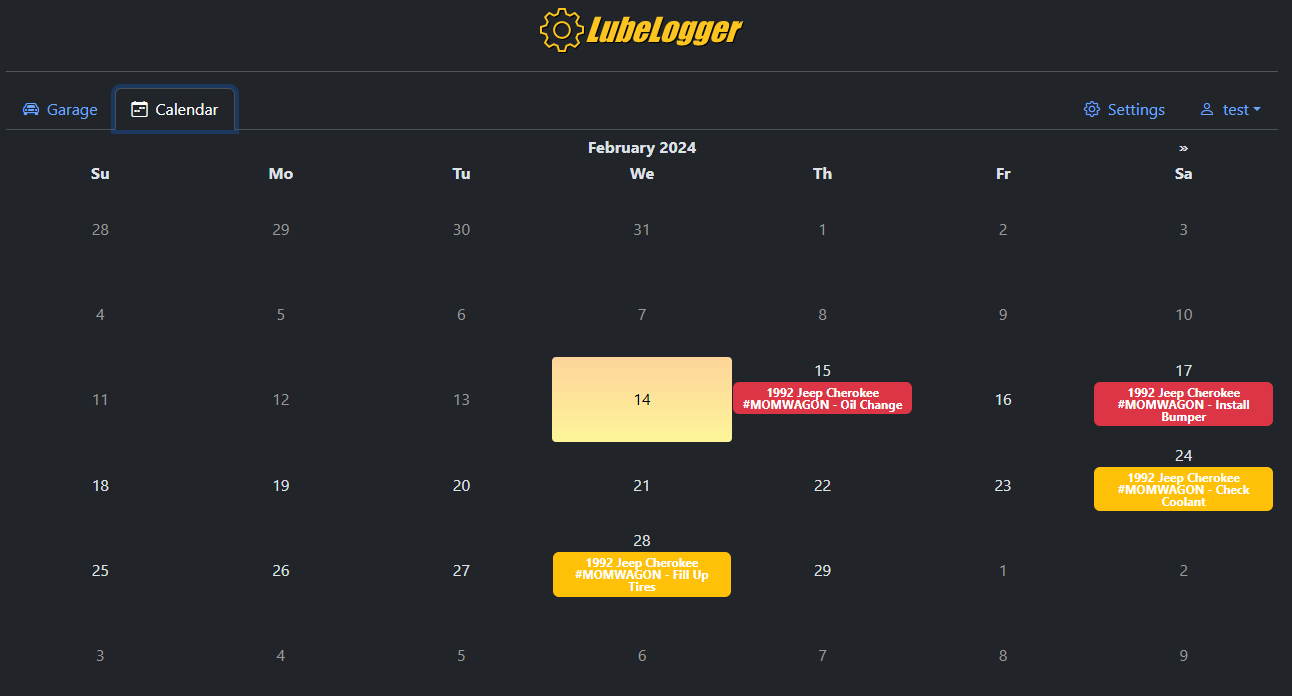 |
| Clicking on the individual reminder item brings up a simplified, readonly prompt displaying additional information for the reminder. If it's a recurring reminder, you will also have to option to postpone / mark the reminder as done if it's in either past due or very urgent status. | |
| - |  |
| + |  |
| ### Inconsistent Reminder Urgency | |
| This tends to happen with reminders that have both a date and odometer metric. Since the Calendar is only concerned about the date metric, it calculates the urgency of the reminder based solely on the date metric. Which means that a reminder can be in "Very Urgent" status when viewed in the Reminders tab but is displayed as "Urgent" in the Calendar. | |
| records/reminders/image-1706403372050.png .. /dev/null | |
| records/reminders/image-1706403470327.png .. /dev/null | |
| records/reminders/image-1706403594197.png .. /dev/null | |
| records/reminders/image-1706404019404.png .. /dev/null | |
| records/reminders/image-1706404336137.png .. /dev/null | |
| records/reminders/image-1706404394320.png .. /dev/null | |
| records/reminders/image-1706404403748.png .. /dev/null | |
| records/reminders/image-1707881929853.png .. /dev/null | |
| records/reminders/image-1707953522160.png .. /dev/null | |
| records/reminders/image-1709602876021.png .. /dev/null | |
| records/reminders/image-1713324582394.png .. /dev/null | |
| /dev/null .. records/reminders/image-1726780085550.png | |
| /dev/null .. records/reminders/image-1726780090370.png | |
| /dev/null .. records/reminders/image-1726780097886.png | |
| /dev/null .. records/reminders/image-1726780105434.png | |
| /dev/null .. records/reminders/image-1726780113529.png | |
| /dev/null .. records/reminders/image-1726780128504.png | |
| /dev/null .. records/reminders/image-1726780138036.png | |
| records/reminders/image-1707953351399.png .. records/reminders/image-1726780142496.png | |
| records/service records.md .. | |
| @@ 9,12 9,12 @@ | |
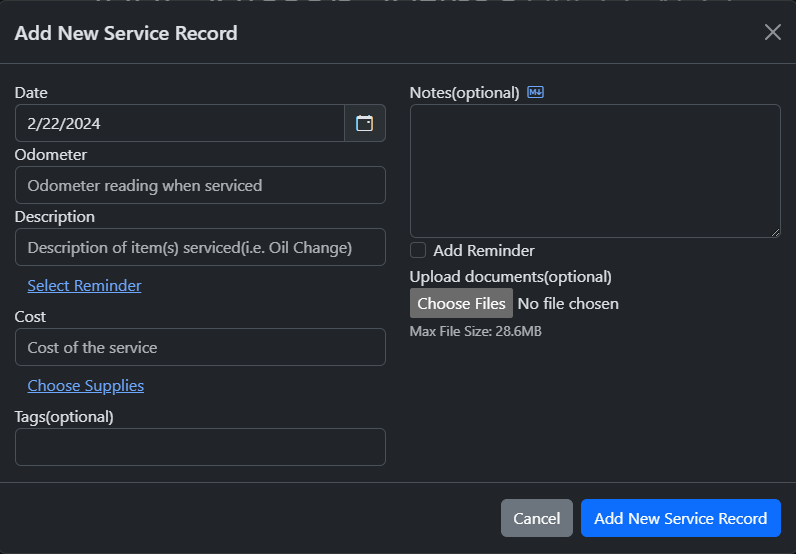
| To add a new record, simply navigate to the tab and click the "Add New Service/Repair/Upgrade Record" button and you will be prompted to input the details of the record. | |
| - |  |
| + |  |
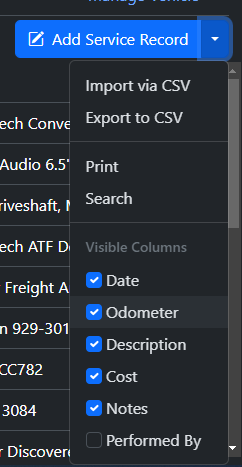
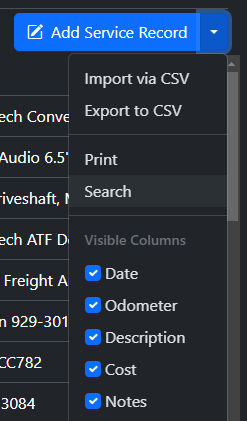
| ## Searching Records | |
| To search through records, simply click on the dropdown button to the right of the Add Record button and select "Search". This is also where you can toggle column visibilities. | |
| - |  |
| + |  |
| A dialog will then prompt you to enter the keyword to search by, note that the keyword is case sensitive. LubeLogger will then search through the records and return records that contain the keyword. i.e.: oil will return "Coils" but not "Oil". The search works for all columns including columns of additional fields but only if "Show Extra Field Columns" option is enabled. | |
| @@ 24,37 24,37 @@ | |
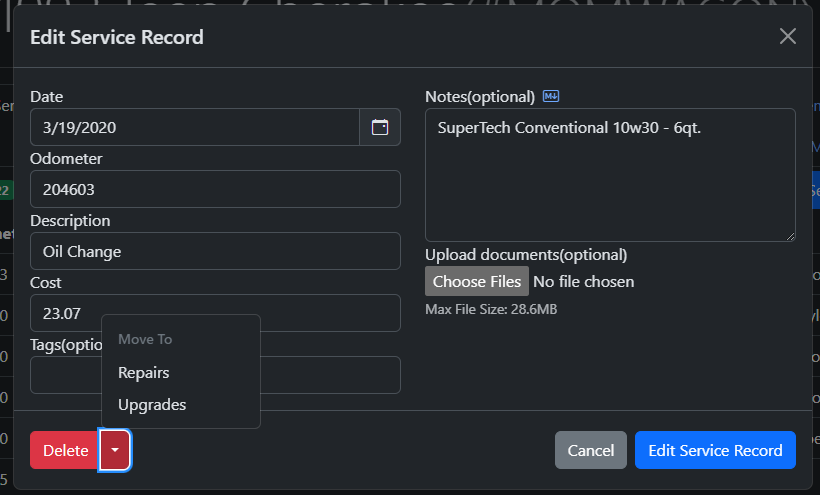
| ## Moving Records | |
| To move existing records between the three tabs, simply click on the dropdown button to the right of the Delete button and select the tab to move the record to. | |
| - |  |
| + |  |
| ## Bulk Operations | |
| - | You can perform bulk operations on multiple records at the same time, for bulk operation details across all tabs, see [[Bulk Operations]] |
| + | You can perform bulk operations on multiple records at the same time, for bulk operation details across all tabs, see [[Bulk Operations|Records/Bulk Operations]] |
| ### Bulk Edit | |
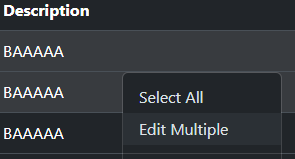
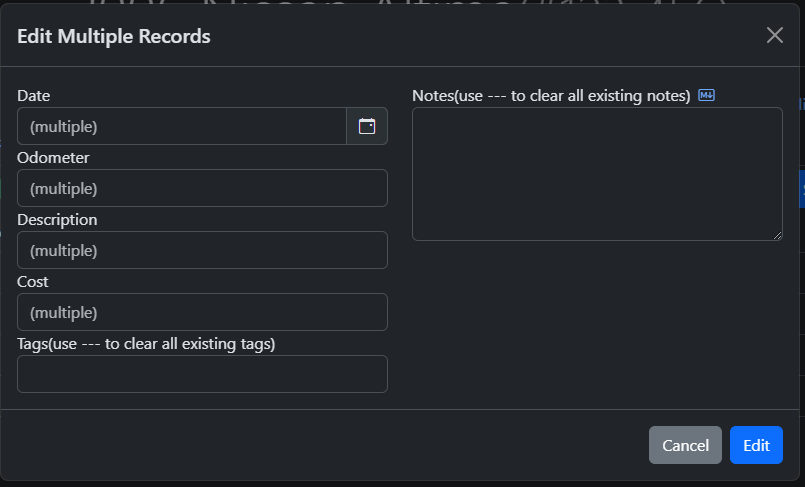
| To edit multiple records at once, simply select more than one record, then right click and select "Edit Multiple" | |
| - |  |
| + |  |
| The multi-record editor will then be displayed, you can overwrite the existing data in those records you wish to edit by inputting data into the fields. Fields left blank means that the existing data for those fields will be unmodified. | |
| - |  |
| + |  |
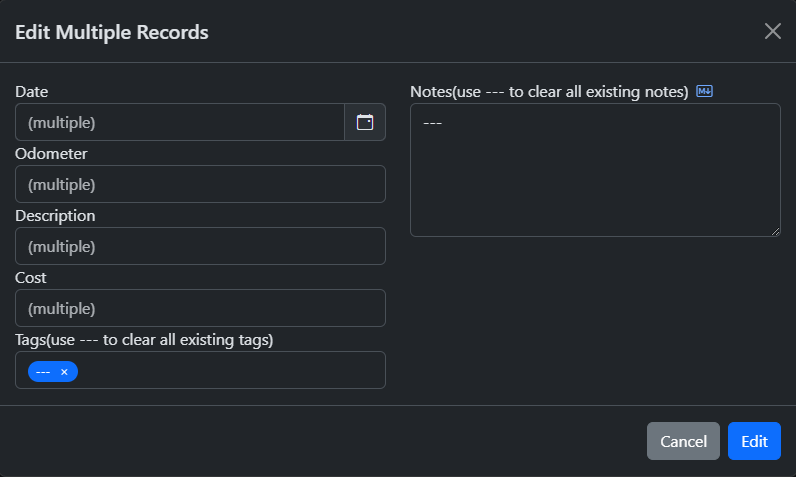
| #### Clearing Tags and Notes | |
| To clear out tags and notes for the selected records, simply add a tag with the text "---" or enter "---" in the notes field and the existing data for those fields will be cleared out. | |
| - |  |
| + |  |
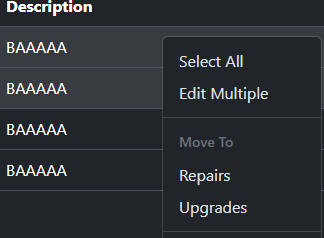
| ### Bulk Move | |
| To move multiple records at once, simply right click on the records you wish to move and select the tab you wish to move those records to. | |
| - |  |
| + |  |
| You will then be prompted for confirmation before those records are moved. | |
| ## Supplies Requisition | |
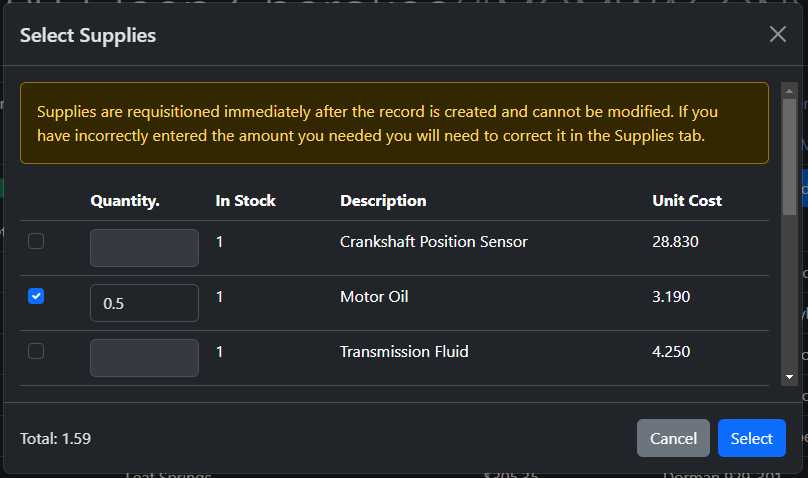
| If you have supplies set up, you can click the "Choose Supplies" link under the Cost field, and a dialog will prompt you to select the supplies and quantity of each supplies you wish to requisition for this record. | |
| - |  |
| + |  |
| Once you have selected the supplies, the Cost field will automatically update to reflect the costs of the supplies you have selected based on the quantity of each supply. Note that at this point, before the record is created, the supply is not requisitioned yet and you can still edit the selected supplies/quantities. | |
| @@ 66,7 66,7 @@ | |
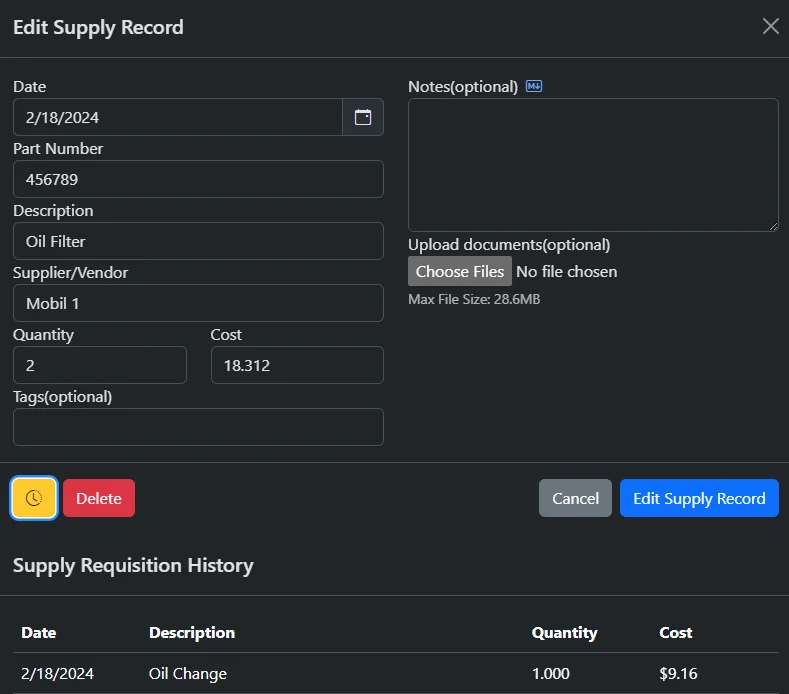
| ### Supplies Requisition History | |
| To view supplies that have been requisitioned for a specific record, simply click on the yellow Shop button to the left of the Delete button | |
| - |  |
| + | 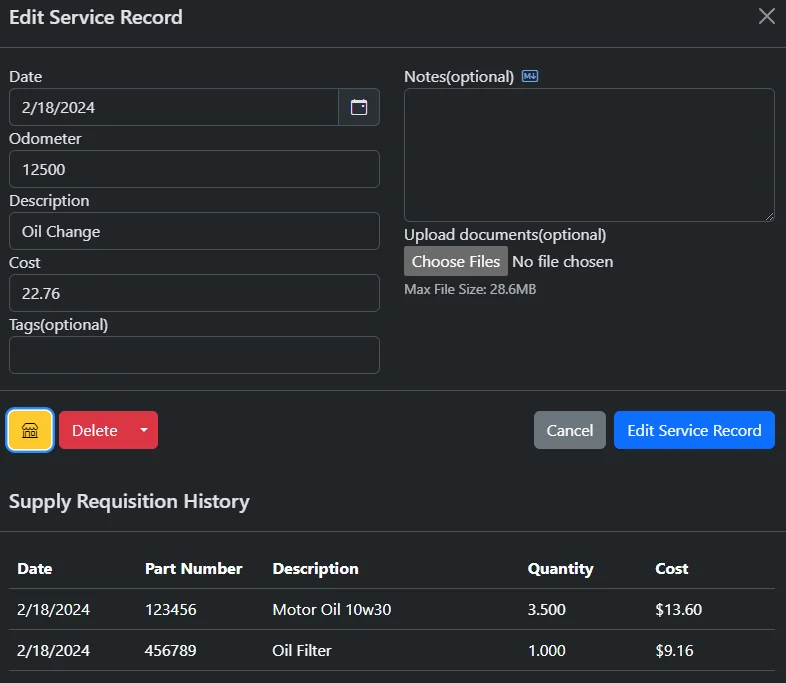 |
| For more information on Supplies, see [[Supplies|Records/Supplies]] | |
| records/service records/image-1706402198461.png .. /dev/null | |
| records/service records/image-1706402206361.png .. /dev/null | |
| records/service records/image-1706455202282.png .. /dev/null | |
| records/service records/image-1706797383329.png .. /dev/null | |
| records/service records/image-1706797399768.png .. /dev/null | |
| records/service records/image-1708626507227.png .. /dev/null | |
| records/service records/image-1708626526827.png .. /dev/null | |
| records/service records/image-1708626937593.png .. /dev/null | |
| records/service records/image-1708627022737.png .. /dev/null | |
| records/service records/image-1708627022832.png .. /dev/null | |
| records/service records/image-1708627266911.png .. /dev/null | |
| records/service records/image-1709320402921.png .. /dev/null | |
| /dev/null .. records/service records/image-1726780618500.png | |
| /dev/null .. records/service records/image-1726780622141.png | |
| /dev/null .. records/service records/image-1726780635763.png | |
| /dev/null .. records/service records/image-1726780652312.png | |
| /dev/null .. records/service records/image-1726780657313.png | |
| /dev/null .. records/service records/image-1726780664270.png | |
| /dev/null .. records/service records/image-1726780669090.png | |
| /dev/null .. records/service records/image-1726780675540.png | |
| records/service records/image-1708446855859.png .. records/service records/image-1726780684428.png | |
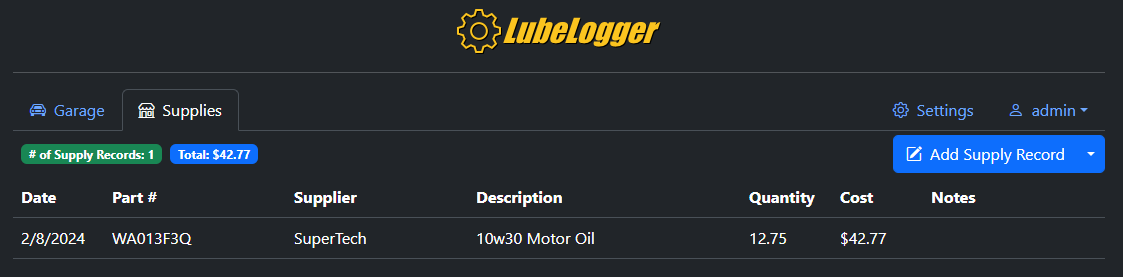
| records/supplies.md .. | |
| @@ 2,15 2,15 @@ | |
| The Supplies tab is where you can keep track of supplies or parts purchased for your vehicle, either as spare parts or for future use. | |
| - | 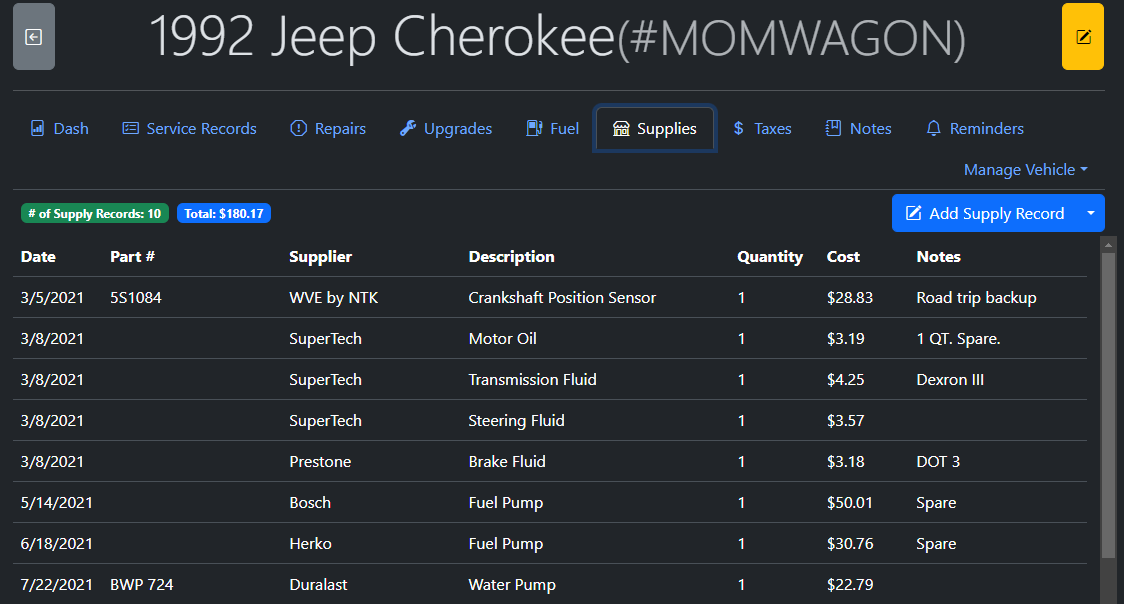 |
| + |  |
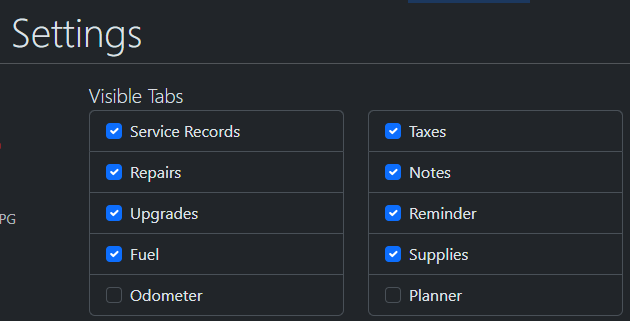
| The Supplies tab is hidden by default and requires the user to enable it via the Settings tab under the "Visible Tabs" section. | |
| - |  |
| + |  |
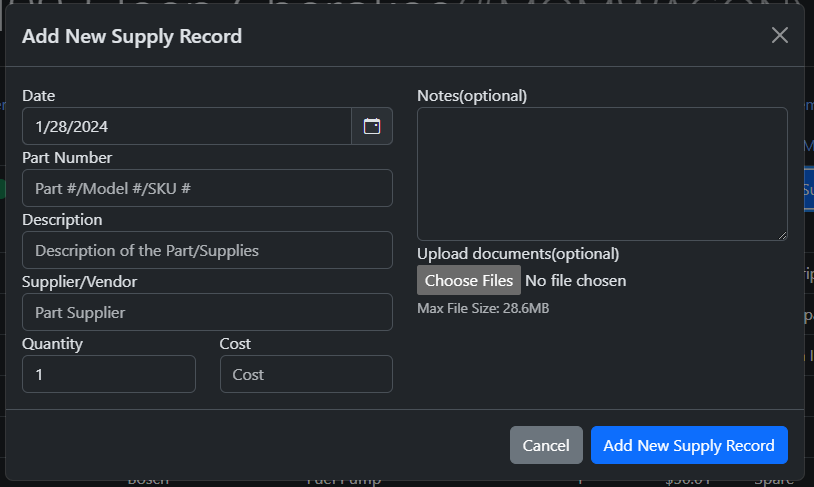
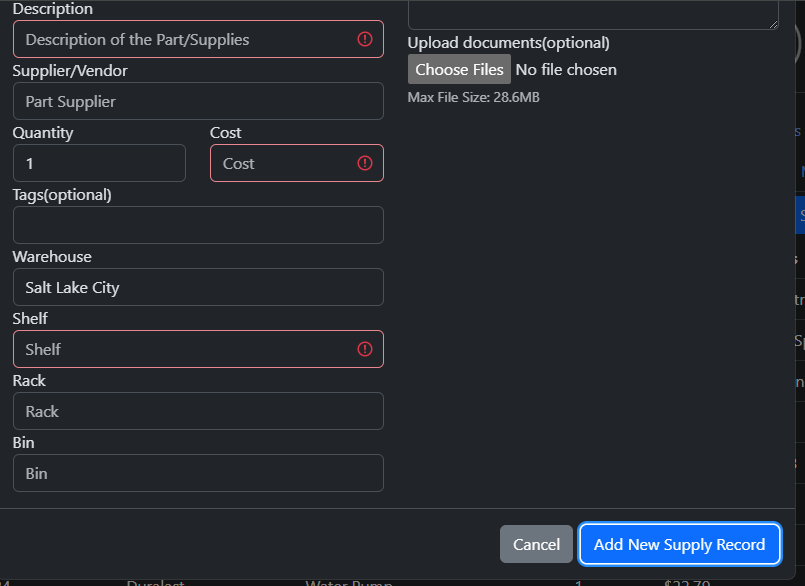
| To add a new Supply Record, simply click the "Add New Supply Record" button and you will be prompted for the details of the Supply. | |
| - |  |
| + |  |
| Supplies that are in the system that have a quantity greater than zero are available for [[Requisitioning|Records/Service Records#supplies-requisition]] | |
| @@ 18,16 18,16 @@ | |
| You can view which records have requisitioned from a supply by clicking on the yellow Clock/History button to the left of the Delete button. | |
| - |  |
| + |  |
| ## Shop Supplies | |
| Shop supplies are for supplies that are at a garage level and is available for requisitioning across all vehicles. This is useful for supplies that are shared across multiple vehicles such as motor oil, washer fluid, tires, etc. | |
| - |  |
| + |  |
| This tab is disabled by default, but can be enabled by the Root User in the Settings tab. | |
| - |  |
| + |  |
| Note that shop supplies are available for all users and all vehicles, do not enable this if you don't wish to share supplies with other users. When enabled, any user can add / edit / delete any shop supplies. | |
| records/supplies/image-1706402930133.png .. /dev/null | |
| records/supplies/image-1706403006743.png .. /dev/null | |
| records/supplies/image-1706403044005.png .. /dev/null | |
| records/supplies/image-1707454148363.png .. /dev/null | |
| records/supplies/image-1707454169597.png .. /dev/null | |
| records/supplies/image-1708446729262.png .. /dev/null | |
| records/supplies/image-1708446766138.png .. /dev/null | |
| /dev/null .. records/supplies/image-1726780208841.png | |
| /dev/null .. records/supplies/image-1726780212316.png | |
| /dev/null .. records/supplies/image-1726780215893.png | |
| /dev/null .. records/supplies/image-1726780220010.png | |
| /dev/null .. records/supplies/image-1726780235632.png | |
| /dev/null .. records/supplies/image-1726780239258.png | |
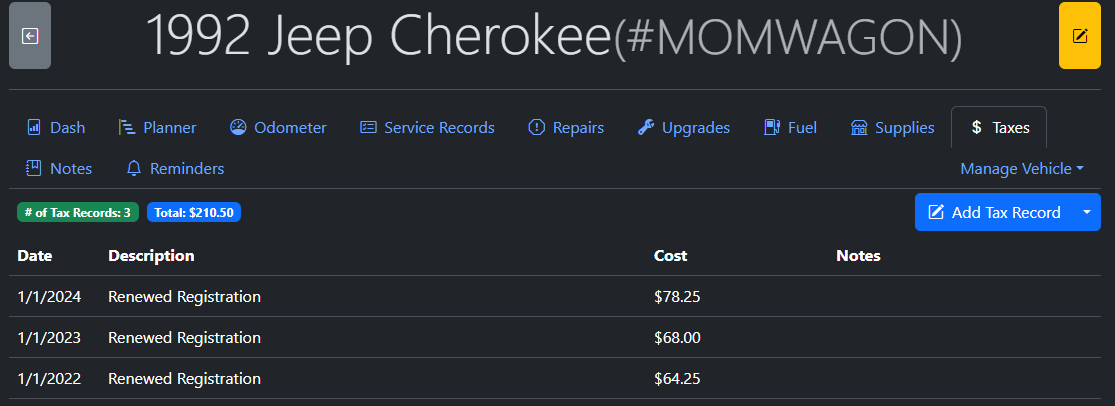
| records/taxes.md .. | |
| @@ 1,7 1,7 @@ | |
| # Taxes | |
| The Taxes tab keeps track of fees and expenses that are incurred by your vehicle that are unrelated to odometer readings. | |
| - |  |
| + |  |
| Examples of records that can be recorded in the Taxes tab include: | |
| - Registration Fee/Road Tax | |
| @@ 14,7 14,7 @@ | |
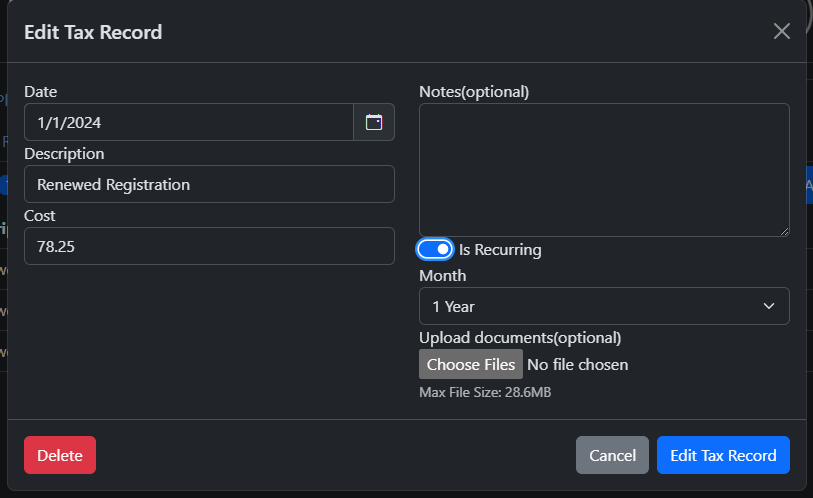
| ## Recurring Taxes | |
| Taxes can be set to be recurring so that a new record is created at every interval. The newly-created tax record is duplicated from the last recurrence. | |
| - |  |
| + |  |
| The way this functionality works is that when the user clicks into a vehicle detail, a check is performed if there are any recurring tax records that are past due. If there are, those tax records are then duplicated with the due date pushed out by the set interval. The newly duplicated will be set to recur at the set interval while the tax record that was past due will have recurrance disabled. | |
| records/taxes/image-1706496894832.png .. /dev/null | |
| records/taxes/image-1706496915044.png .. /dev/null | |
| /dev/null .. records/taxes/image-1726780399871.png | |
| /dev/null .. records/taxes/image-1726780403362.png | |
| replacing the logo/image-1706653561611.png .. /dev/null | |
| replacing the logo/image-1706653589259.png .. /dev/null | |
| translations/image-1707068227706.png .. /dev/null | |
| translations/image-1707068703210.png .. /dev/null | |
| vehicle management/image-1706399707176.png .. /dev/null | |
| vehicle management/image-1706399802501.png .. /dev/null | |
| vehicle management/image-1706399816305.png .. /dev/null | |
| vehicle management/image-1706399939254.png .. /dev/null | |
| vehicle management/image-1706399954106.png .. /dev/null | |
| vehicle management/image-1706400015891.png .. /dev/null | |
| vehicle management/image-1706400064717.png .. /dev/null | |
| vehicle management/image-1706400198451.png .. /dev/null | |
| vehicle management/image-1706759765922.png .. /dev/null | |
| vehicle management/image-1706759782021.png .. /dev/null | |
| vehicle management/image-1706759823490.png .. /dev/null | |
| vehicle management/image-1708205404357.png .. /dev/null | |
| vehicle management/image-1710623727213.png .. /dev/null | |
| vehicle management/image-1710623817365.png .. /dev/null | |
| vehicle management/image-1710623866044.png .. /dev/null | |
| vehicle management/image-1710623882598.png .. /dev/null | |
| vehicle management/image-1710624911782.png .. /dev/null | |
| vehicle management/image-1713323615790.png .. /dev/null | |
| vehicle management/image-1713323686365.png .. /dev/null | |
| vehicle management/image-1713323743085.png .. /dev/null | |
| vehicle management/image-1713323823158.png .. /dev/null | |
| vehicle management/image-1713365839064.png .. /dev/null | |
| dashboard.md .. vehicles/dashboard.md | |
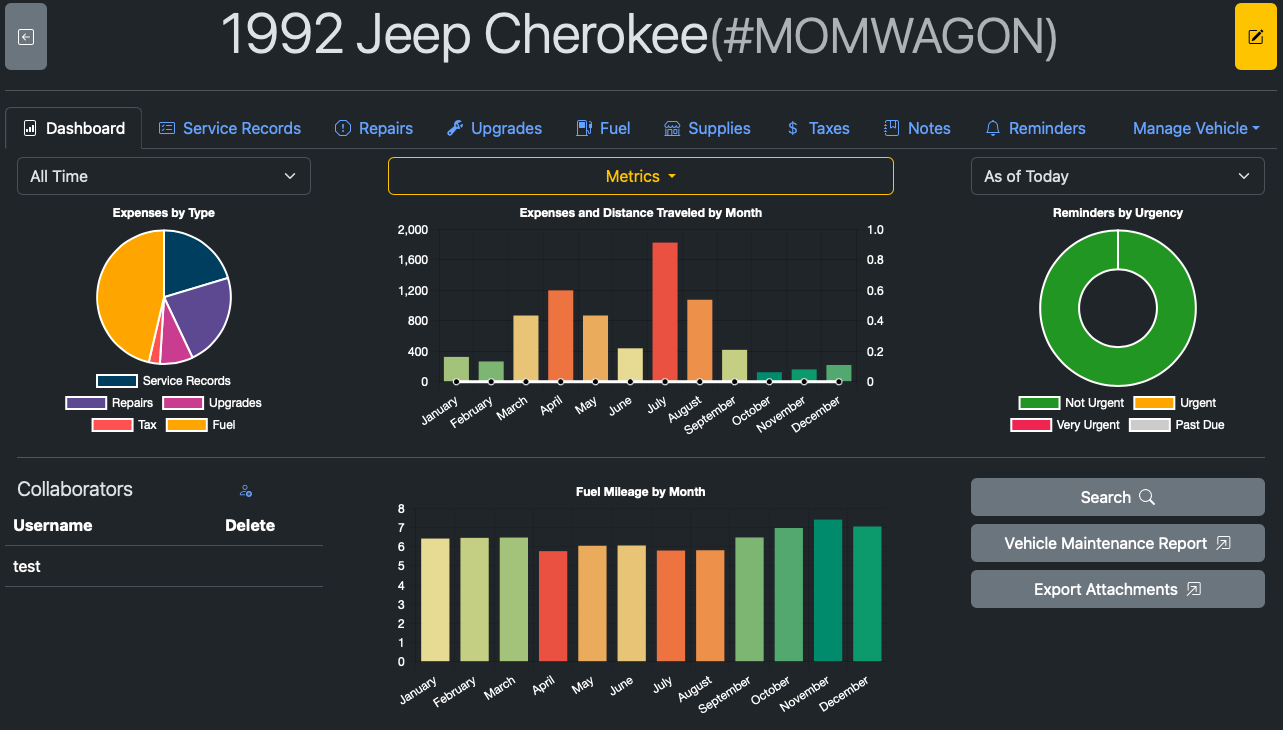
| @@ 2,13 2,13 @@ | |
| The Dashboard is where you get an overview of your vehicle. It is the default tab that the user will see when they click into a vehicle and it is also the only tab that cannot be hidden. | |
| - |  |
| + |  |
| The Dashboard includes the following data: | |
| - Expenses By Type By Year/All Time(Top-Left) | |
| - Total Expenses By Month and Distance Traveled By Year/All Time(Top-Center) | |
| - Reminders by current date or future date(Top-Right) | |
| - | - Collaborators(Bottom-Left), see [[Adding Collaborators|Vehicle Management#adding-a-collaborator]] |
| + | - Collaborators(Bottom-Left), see [[Adding Collaborators|Vehicles/Vehicle Management#adding-a-collaborator]] |
| - Fuel Mileage By Month By Year/All Time(Bottom-Center) | |
| - Vehicle Maintenance Report Generator(Bottom-Right) | |
| @@ 17,7 17,7 @@ | |
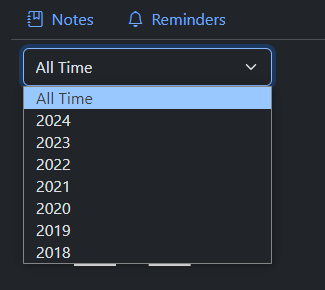
| Note: Changing the selected year will automatically refresh the Expenses by Type Pie Chart, the Total Expenses by Month and the Fuel Mileage By Month Bar Charts. | |
| - |  |
| + |  |
| ### Notes on Distance Traveled | |
| The Distance Traveled chart relies solely on the odometer records found in [[Odometer|Records/Odometer]] | |
| @@ 25,16 25,16 @@ | |
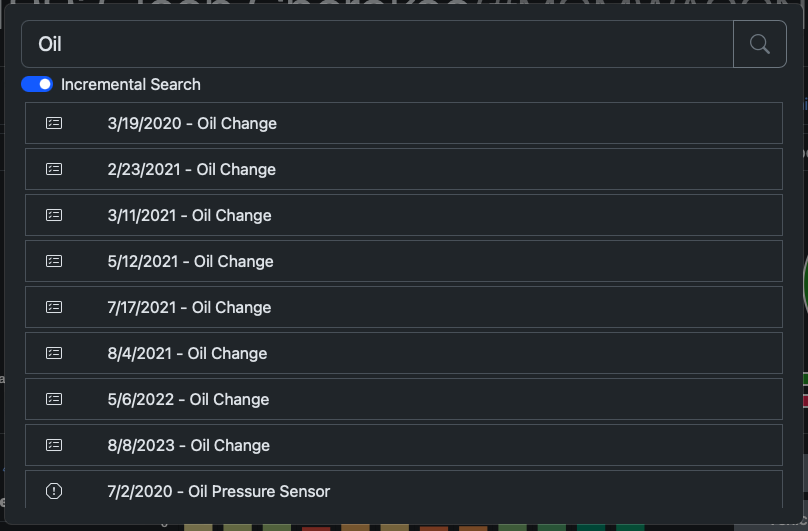
| ## Global Search | |
| The Global Search function allows the user to search for keywords across different records. Note that the search results are dependent on the visible tabs, i.e.: the user will not get results in Service Records if the Service Records tab is not visible. Incremental Search is enabled by default, which means that the app will search as the user is typing, this can cause performance issues if you have a large amount of records, so it is recommended that incremental search is disabled and search be performed manually by either pressing the Enter key or clicking the Search button. | |
| - |  |
| + |  |
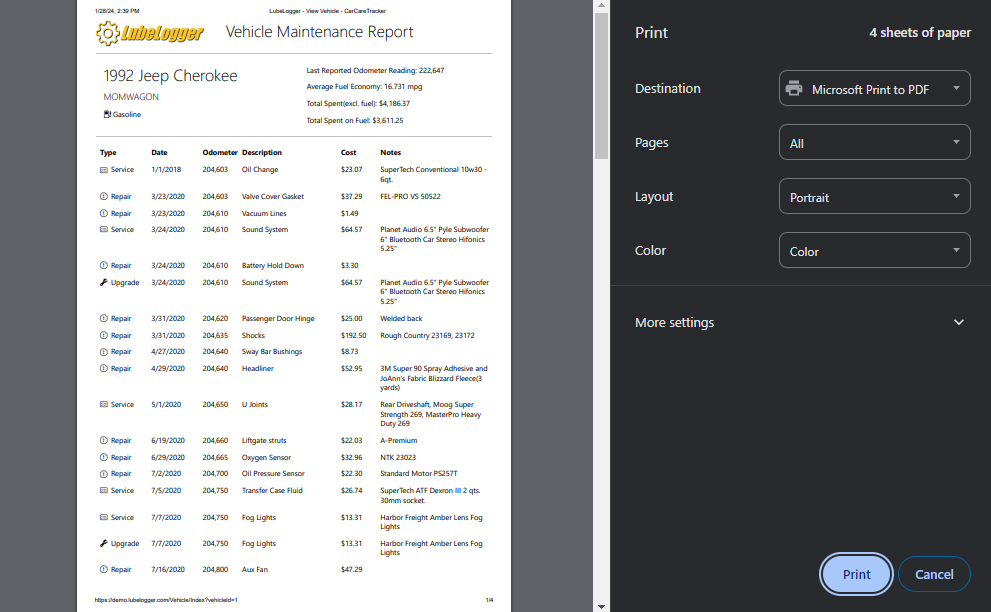
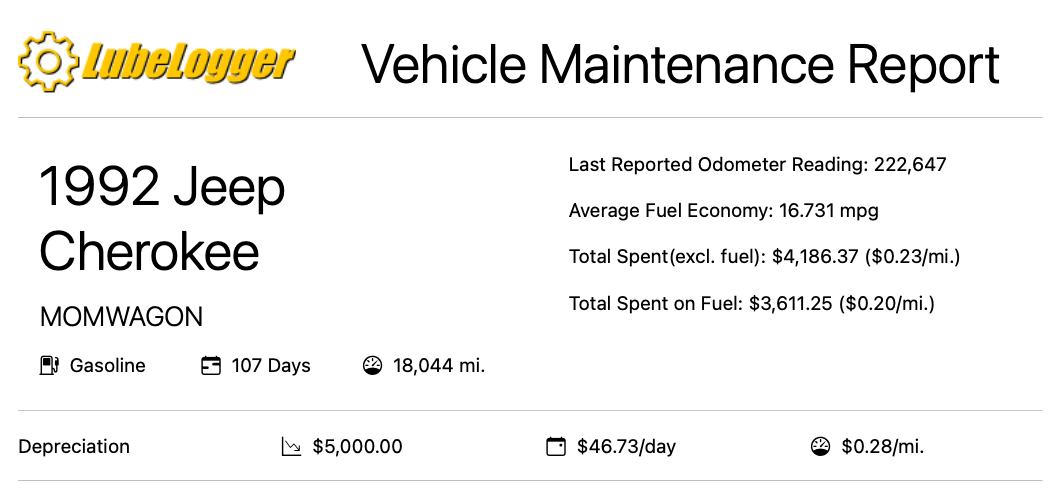
| ## Vehicle Maintenance Report | |
| The Vehicle Maintainence Report Generator is a button that will generate a consolidated report of all work performed on the vehicle. For performance reasons, this report is designed to be printed as soon as it is generated. You can either choose to print it to paper or PDF. | |
| - |  |
| + |  |
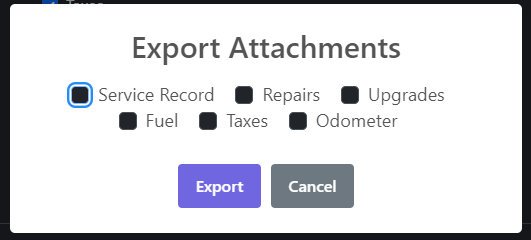
| ## Export Attachments | |
| The Export Attachments button provies a convenient feature to export all attachments into a chronologically-ordered zip file. Upon clicking the button, you will be prompted to select which tabs you want attachments to be exported from. | |
| - |  |
| + |  |
| Once you have made your selection, a zip file will be created and downloaded onto your computer. This zip file contains all of the attachments and are named in chronological order(i.e.: the oldest attachment will be named 0 and the second oldest attachment 1, 2...) | |
| /dev/null .. vehicles/dashboard/image-1726782300852.png | |
| /dev/null .. vehicles/dashboard/image-1726782316958.png | |
| /dev/null .. vehicles/dashboard/image-1726782323377.png | |
| /dev/null .. vehicles/dashboard/image-1726782329289.png | |
| /dev/null .. vehicles/dashboard/image-1726782334332.png | |
| vehicle management.md .. vehicles/vehicle management.md | |
| @@ 3,21 3,21 @@ | |
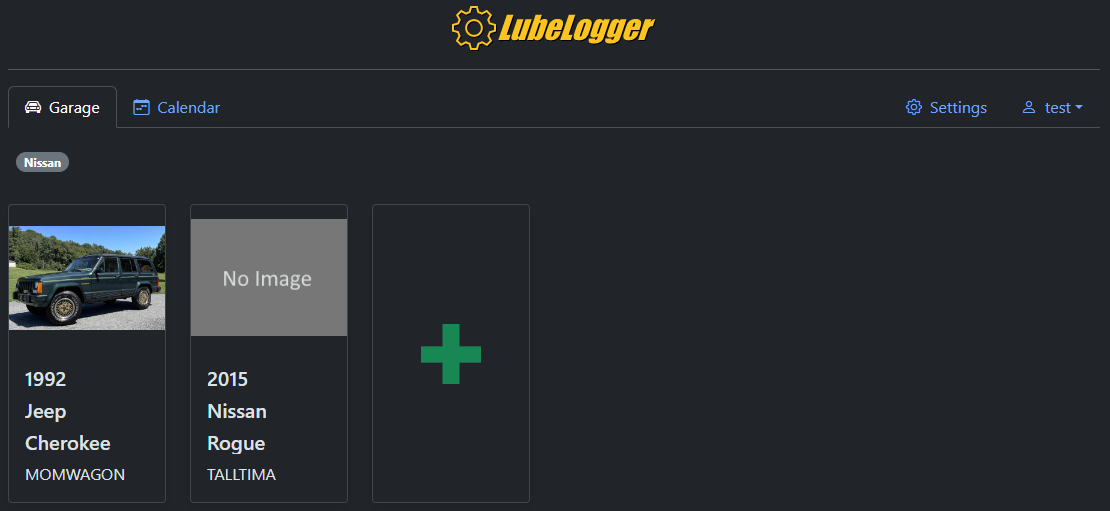
| ## Adding a Vehicle | |
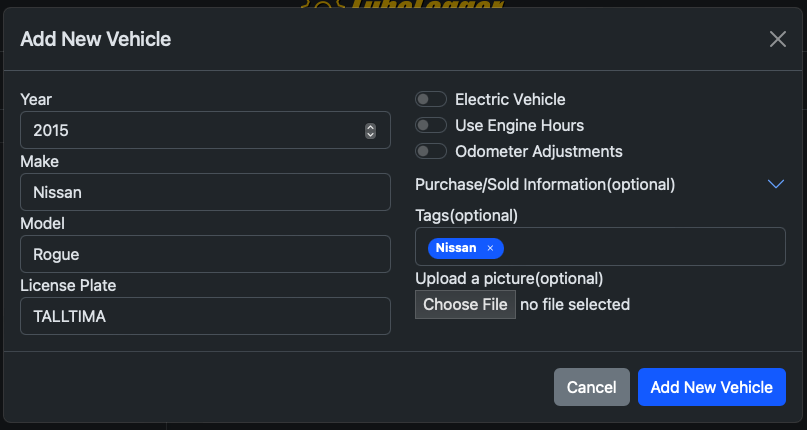
| To add a vehicle, simply click on the green "+" button in the "Garage" tab. A dialog will then prompt you for the following details of the vehicle you wish to add: Year, Make, Model, License Plate, and optionally, a picture of the vehicle. If it's an Electric Vehicle, you should check the "Electric Vehicle" switch. This ensures that "fuel" economy is measured in kWh instead of gallons or liters. | |
| - |  |
| + |  |
| Once you're done, click "Add New Vehicle" and the vehicle will now be visible in the Garage Tab. | |
| - |  |
| + |  |
| ### Purchase and Sold Information | |
| These optional fields are used to calculate duration of ownership as well as any depreciation or appreciation costs. For length of ownership, you must provide a Purchase Date, if Sold Date was not provided, LubeLogger will calculate the amount of days between the current day and the Purchase Date as length of ownership. If both Purchase and Sold Costs are provided, LubeLogger will calculate any depreciation / appreciation costs as well as the cost per mile and cost per day. These data will show up in the Vehicle Maintenance History Report under its own section. | |
| - |  |
| + |  |
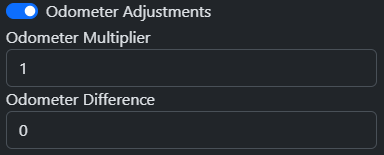
| ### Odometer Adjustments | |
| Odometer Adjustments are conversions that will be applied to the odometer field when **adding** a new Service/Repair/Upgrade/Fuel Record. | |
| - |  |
| + |  |
| #### Odometer Multiplier | |
| The multiplier that will be applied on the record's odometer field. Primarily used for vehicles where the odometer uses a different unit compared to the user's settings. E.g.: A user residing in the U.S. or U.K. which uses miles as the distance unit imports a vehicle that uses kilometers(Kei trucks, motorcycles, etc). | |
| @@ 44,20 44,20 @@ | |
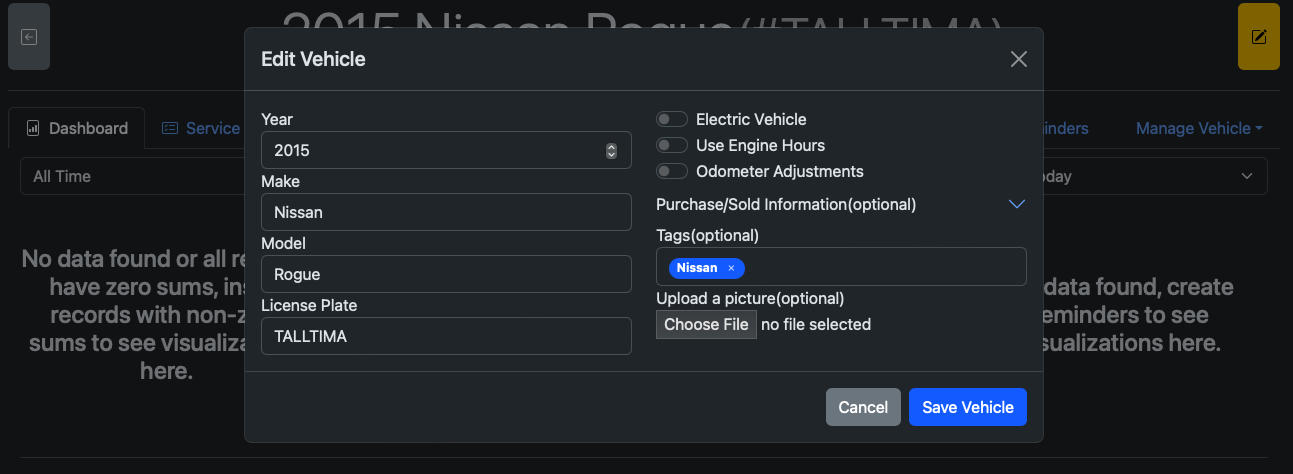
| ## Editing a Vehicle | |
| To edit an existing vehicle, go into the vehicle details by clicking on the vehicle tile in the Garage. If you're on a computer/tablet, there will be a yellow button on the top right of the screen, click it to edit details regarding the vehicle. | |
| - |  |
| + |  |
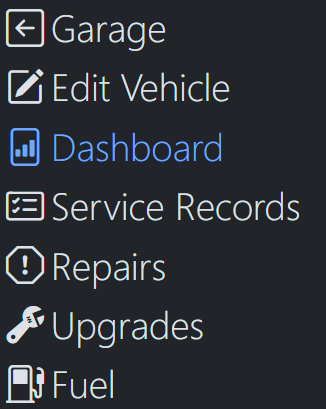
| On mobile devices, the "Edit Vehicle" button is available within the menu | |
| - |  |
| + |  |
| ## Deleting a Vehicle. | |
| To delete an existing vehicle, click on the "Manage Vehicle" dropdown and select "Delete Vehicle". You will then be prompted for confirmation before the vehicle is deleted. Once the vehicle is deleted, you will be redirected back to the Garage. | |
| - |  |
| + |  |
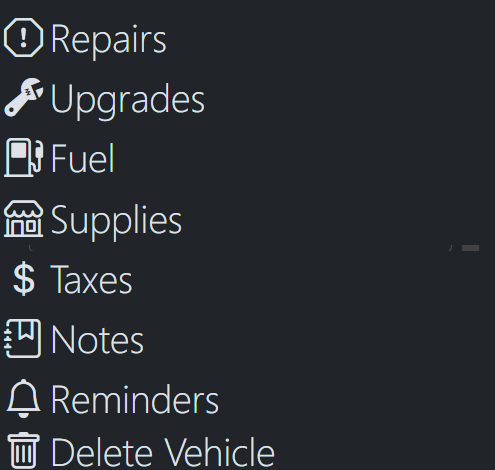
| On mobile devices, the "Delete Vehicle" button is available within the menu, located at the very bottom. | |
| - |  |
| + |  |
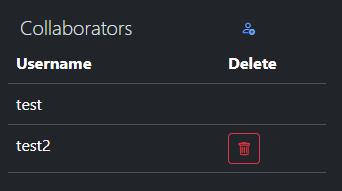
| ## Collaborators | |
| @@ 67,15 67,15 @@ | |
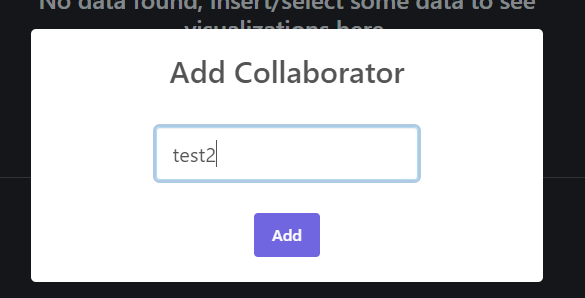
| To add new collaborator, simply navigate to the Dashboard tab in the vehicle details view and look to the bottom right: | |
| - |  |
| + |  |
| Click on the blue Add User icon on the top left of the Collaborators panel and you will be prompted to type in their username, note that a user with that username must exist in the system or you will get an error. | |
| - |  |
| + |  |
| Once you have added them as a collaborator, their name will now show up in the Collaborators list, and you will also be given the option to remove them. | |
| - |  |
| + |  |
| Once this is done, you should have the new collaborator refresh their browser and they should be able to see the vehicle in their Garage. | |
| @@ 83,4 83,4 @@ | |
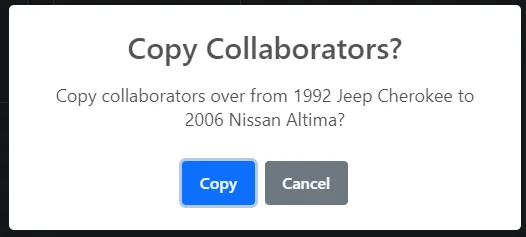
| To copy collaborators from one vehicle to another, simply navigate to the garage tab, drag and drop the vehicle you wish to copy the collaborators from onto the vehicle you wish to copy collaborators to. You will be prompted for confirmation and the collaborators will be copied over. | |
| - |  |
| + |  |
| /dev/null .. vehicles/vehicle management/image-1726782172201.png | |
| /dev/null .. vehicles/vehicle management/image-1726782176398.png | |
| /dev/null .. vehicles/vehicle management/image-1726782180243.png | |
| /dev/null .. vehicles/vehicle management/image-1726782183928.png | |
| /dev/null .. vehicles/vehicle management/image-1726782194546.png | |
| /dev/null .. vehicles/vehicle management/image-1726782199623.png | |
| /dev/null .. vehicles/vehicle management/image-1726782209700.png | |
| /dev/null .. vehicles/vehicle management/image-1726782216539.png | |
| vehicle management/image-1706400316910.png .. vehicles/vehicle management/image-1726782223006.png | |
| vehicle management/image-1706400382568.png .. vehicles/vehicle management/image-1726782230259.png | |
| vehicle management/image-1706400425454.png .. vehicles/vehicle management/image-1726782235900.png | |
| vehicle management/image-1708444998496.png .. vehicles/vehicle management/image-1726782240868.png | |
| webhook/image-1710625286004.png .. /dev/null | |